Wheel Polishing
#1
 02-18-2010, 11:33 AM


Thanks to SIRIUS at Club Civic for this life saving DIY!
----
Because I have had people PM'ing and asking that I make a how-to after I posted pics of my DIY polished wheels here it is. Please note that I am posting how I did it and the results are as pictured. I'm sure there are many different ways to do this and you may disagree with some of the steps but the results speak for themselves.
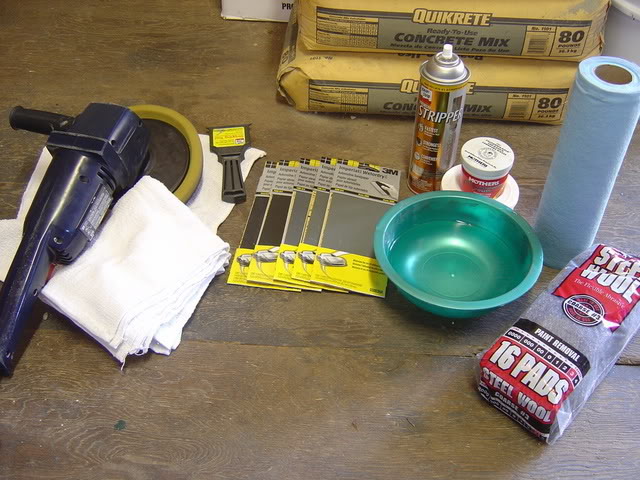
First off what you'll need:
-Aircraft Stripper 2-cans (I used Aerosol but the brush on is fine also)
-Plastic scraper
-Shop Towels/Paper towels
-Wet/Dry sandpaper in the following grits (320, 600, 800, 1000, 1500, 2000). For a complete set of wheels 4 sheets (1 for each wheel) should do.
-"Paint Removal" grade steel wool
-Clean 100% terry cloth towels
-Mothers aluminum/metal polish
-Rubbing compound
-Bowl for water
-Rotary buffer
-Buffing pad(s)
-Gloves
-Goggles
-long sleeve shirt/long pants
After you have gathered up everything you need wash and clean all the grime off your wheel. Especially the face of the wheel that you'll be polishing (clean it real good). This is a lot easier of the tire is off the rim but if not that's OK too.
Next you are going to spray/brush on your aircraft stripper. Obviously if the tire is still on you are going to have to take some steps to mask off the tire. I honestly can't tell you what to use b/c I had the tire off the rim.
From my experience it's best to leave the stripper on the rim for at least 30 mins (let the stripper do all the work). What you are doing here is stripping any clear/paint from the wheel. I did not take any pics of this step b/c I didn't want to handle my camera. However I can see that more than one application may be necessary depending on the type of stripper you're using and the condition of the wheels.
Hose off the wheel after the stripper has sat an adequate amount of time and use the plastic scraper to remove the clear/paint (Si's only have a clear). Please be sure to do this a well ventilated area. Use the steel wool to remove any final residue and to prep for the first batch of sanding. Don't be scared to "scratch" the rim with the steel wool as it will sand out.
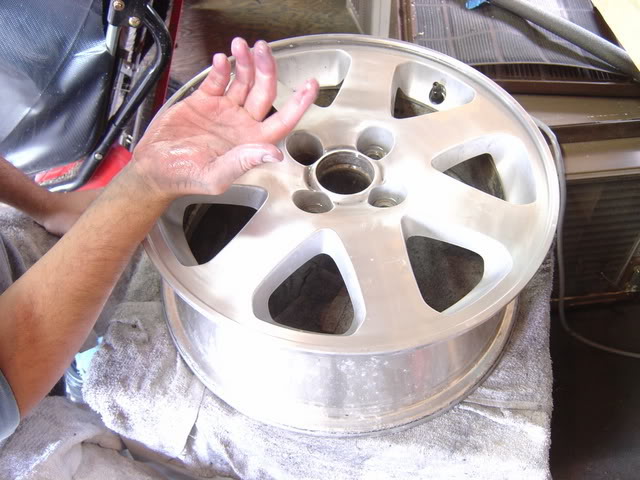
Here's what you should have to start with after the stripper and steel wool (notice the really bad area around the center of the wheel where the cap goes and the scratches on the face of the rim):

In my case I started off with the 320 grit. Use your own best judgement on what grit you feel comfortable getting started with, but like I said I'll let the final outcome speak for itself. Fold the sheet into thirds and try to divide the wheel into thirds as well as far as rotating the paper. Have your bowl of clean water handy and "dunk" the paper frequently to clean off the metal your sanding and try to keep the face of the wheel wet as well.
Here's me underway (stretch out those arm muscles LOL):
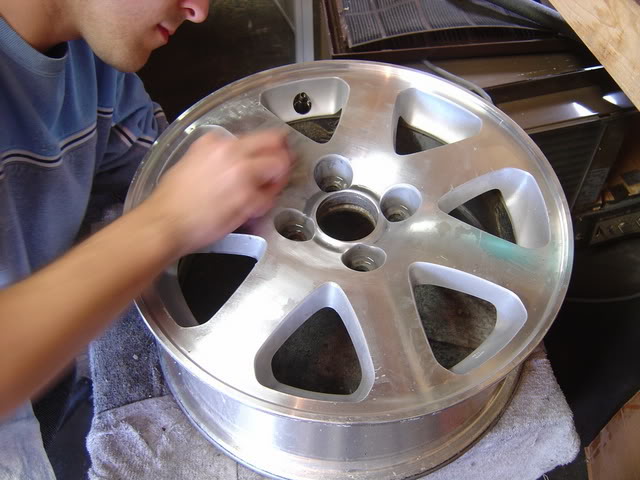
The way I did it is I worked from the center of the rim out doing a small section at a time typically counting out 50-60 strokes per area per grit. Do the whole wheel with one grit and then inspect it and make sure it looks consistent. If something looks "inconsistent" take the time to take care of it right then and there as it becomes more of a hassle later on in the process. You'll be able to judge it from the machining marks and the "brightness" of the metal.
After the 320 grit (I think it looks better already):
I then moved on to the 600 grit:
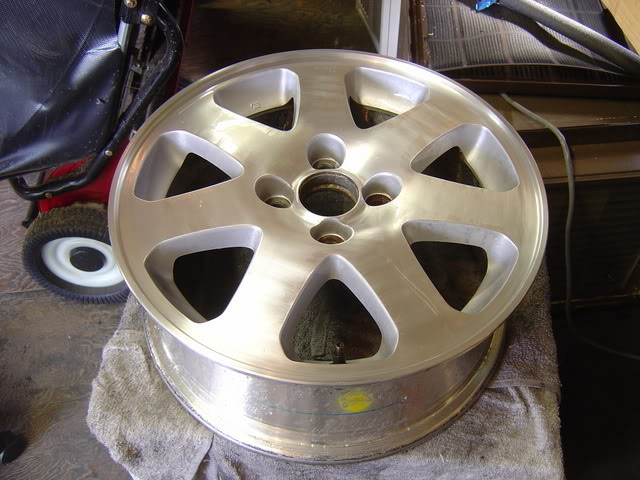
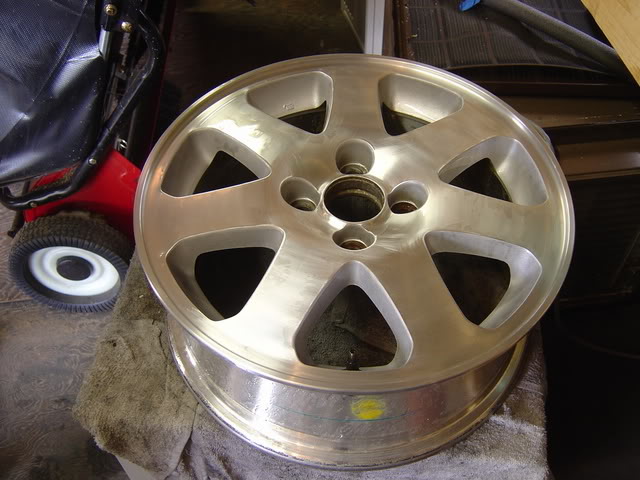
Follow that up with 800 grit (after the 800 grit just about all of the major imperfection should be gone). At this point you are truly "polishing" the metal. If you still have imperfections go back and sand them out with the heavier grits:

This is my 4th and final wheel and my fingertips look like this (that's blood) if you're doing this right you should have bleeding fingers....j/k:
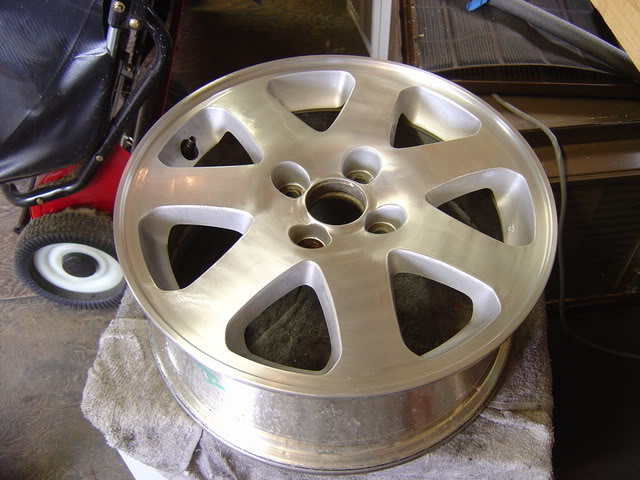
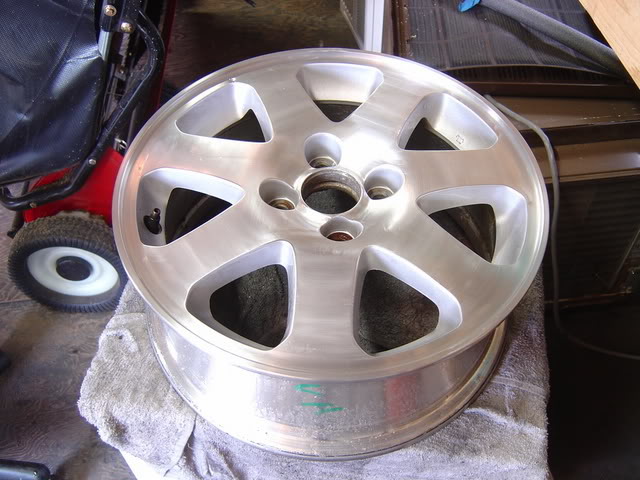
We are now getting into the "fine" grit sandpapers and you can really start to see a difference. Oh yea, I didn't mention this but obviously rinse off the wheel and get a clean bowl of water after each grit. This is what the wheel should look like after 1000 grit:
Next up is the 1500 (Almost there):
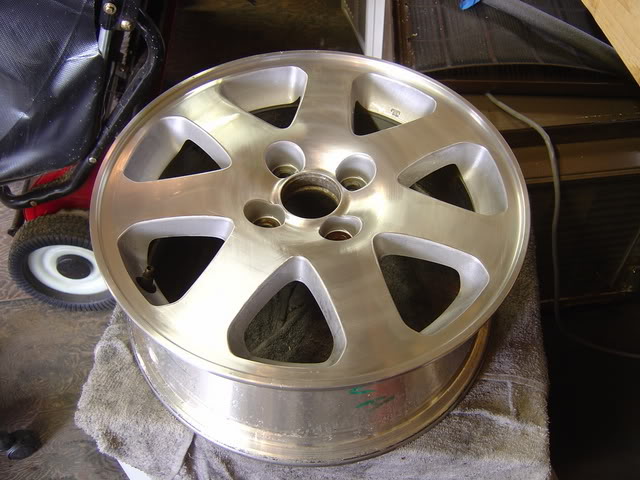
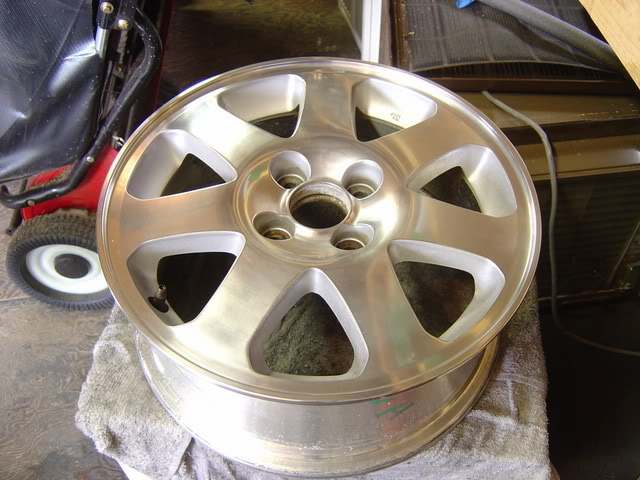
This next step is a point of contention as some people think you should stop after the 1500 and use the metal polish. I'm sure that works but I went ahead with the 2000 though. This is what it looked like after(tough to tell the true difference in pics from 1500/2000 but there is a difference):
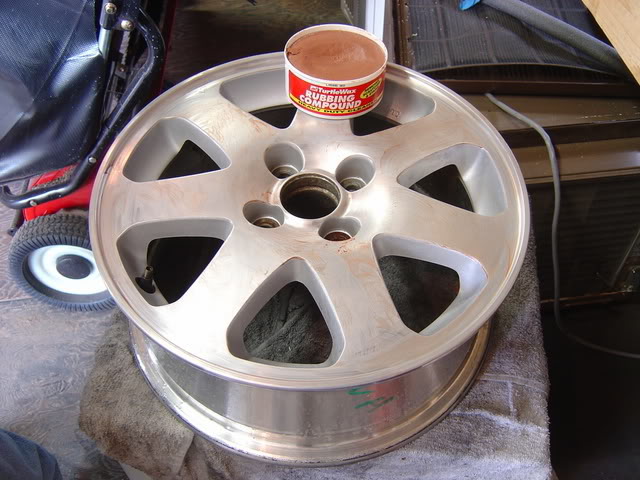
Next up and again some people do it differently was a coat of polsihing compound to get out any remaining ultra-fine scratches and prep for the final metal polish. I used a cheapy rotary buffer and a buffing pad. Apply the compound with a paper/shop towel. No need to slab it on. A light coat will do:
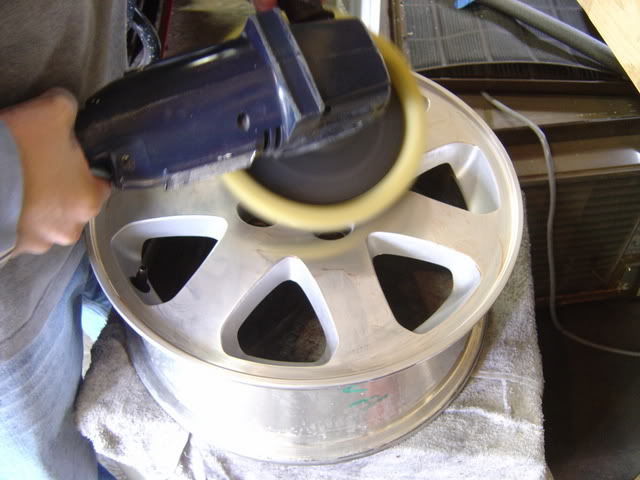
Bust out the buffer and get crazy (I'm no pro just take your time and you'll be OK, seemed to work for me):
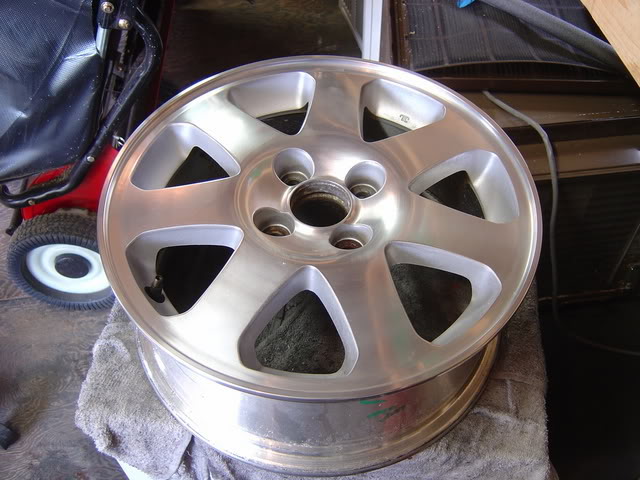
What it looked like after the buff (No too shabby eh?):
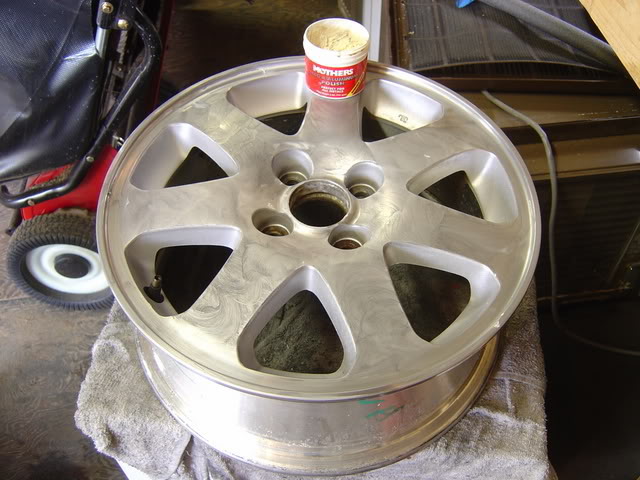
Grab your Mothers polish and the terry towel and put a light coat on the face and let it sit a little while (5-10 mins) and let it haze up and darken a little.
Hand buff it with a clean towel (keep folding and flipping the towel to a clean side) Should look like this when you're done:
3 of the 4 are obviously pictured.
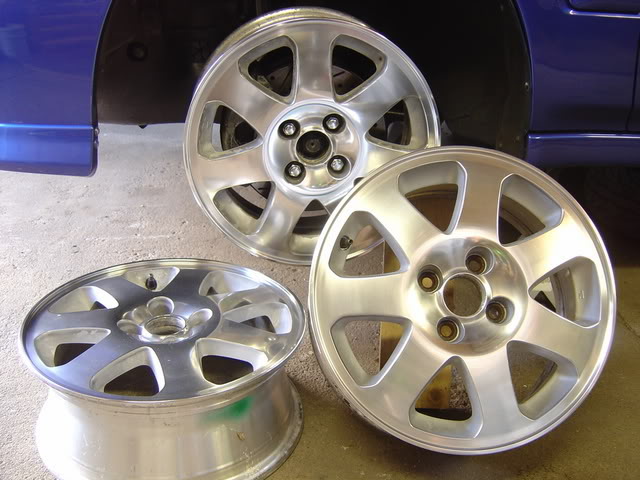
There you have it. A sore arm, you killed approx 5 hours, and you have a bligtastic rim to show for it. Now you repeat this process 3 more times and you're good to go. PM me with any questions and I'll be happy to try and answer any questions.
I hope this helps some of you out. I had fun doing it believe it or not (helps that I have a beer fridge in my garage LOL).
----
Because I have had people PM'ing and asking that I make a how-to after I posted pics of my DIY polished wheels here it is. Please note that I am posting how I did it and the results are as pictured. I'm sure there are many different ways to do this and you may disagree with some of the steps but the results speak for themselves.
First off what you'll need:
-Aircraft Stripper 2-cans (I used Aerosol but the brush on is fine also)
-Plastic scraper
-Shop Towels/Paper towels
-Wet/Dry sandpaper in the following grits (320, 600, 800, 1000, 1500, 2000). For a complete set of wheels 4 sheets (1 for each wheel) should do.
-"Paint Removal" grade steel wool
-Clean 100% terry cloth towels
-Mothers aluminum/metal polish
-Rubbing compound
-Bowl for water
-Rotary buffer
-Buffing pad(s)
-Gloves
-Goggles
-long sleeve shirt/long pants
After you have gathered up everything you need wash and clean all the grime off your wheel. Especially the face of the wheel that you'll be polishing (clean it real good). This is a lot easier of the tire is off the rim but if not that's OK too.
Next you are going to spray/brush on your aircraft stripper. Obviously if the tire is still on you are going to have to take some steps to mask off the tire. I honestly can't tell you what to use b/c I had the tire off the rim.
From my experience it's best to leave the stripper on the rim for at least 30 mins (let the stripper do all the work). What you are doing here is stripping any clear/paint from the wheel. I did not take any pics of this step b/c I didn't want to handle my camera. However I can see that more than one application may be necessary depending on the type of stripper you're using and the condition of the wheels.
Hose off the wheel after the stripper has sat an adequate amount of time and use the plastic scraper to remove the clear/paint (Si's only have a clear). Please be sure to do this a well ventilated area. Use the steel wool to remove any final residue and to prep for the first batch of sanding. Don't be scared to "scratch" the rim with the steel wool as it will sand out.
Here's what you should have to start with after the stripper and steel wool (notice the really bad area around the center of the wheel where the cap goes and the scratches on the face of the rim):
In my case I started off with the 320 grit. Use your own best judgement on what grit you feel comfortable getting started with, but like I said I'll let the final outcome speak for itself. Fold the sheet into thirds and try to divide the wheel into thirds as well as far as rotating the paper. Have your bowl of clean water handy and "dunk" the paper frequently to clean off the metal your sanding and try to keep the face of the wheel wet as well.
Here's me underway (stretch out those arm muscles LOL):
The way I did it is I worked from the center of the rim out doing a small section at a time typically counting out 50-60 strokes per area per grit. Do the whole wheel with one grit and then inspect it and make sure it looks consistent. If something looks "inconsistent" take the time to take care of it right then and there as it becomes more of a hassle later on in the process. You'll be able to judge it from the machining marks and the "brightness" of the metal.
After the 320 grit (I think it looks better already):
I then moved on to the 600 grit:
Follow that up with 800 grit (after the 800 grit just about all of the major imperfection should be gone). At this point you are truly "polishing" the metal. If you still have imperfections go back and sand them out with the heavier grits:
This is my 4th and final wheel and my fingertips look like this (that's blood) if you're doing this right you should have bleeding fingers....j/k:
We are now getting into the "fine" grit sandpapers and you can really start to see a difference. Oh yea, I didn't mention this but obviously rinse off the wheel and get a clean bowl of water after each grit. This is what the wheel should look like after 1000 grit:
Next up is the 1500 (Almost there):
This next step is a point of contention as some people think you should stop after the 1500 and use the metal polish. I'm sure that works but I went ahead with the 2000 though. This is what it looked like after(tough to tell the true difference in pics from 1500/2000 but there is a difference):
Next up and again some people do it differently was a coat of polsihing compound to get out any remaining ultra-fine scratches and prep for the final metal polish. I used a cheapy rotary buffer and a buffing pad. Apply the compound with a paper/shop towel. No need to slab it on. A light coat will do:
Bust out the buffer and get crazy (I'm no pro just take your time and you'll be OK, seemed to work for me):
What it looked like after the buff (No too shabby eh?):
Grab your Mothers polish and the terry towel and put a light coat on the face and let it sit a little while (5-10 mins) and let it haze up and darken a little.
Hand buff it with a clean towel (keep folding and flipping the towel to a clean side) Should look like this when you're done:
3 of the 4 are obviously pictured.
There you have it. A sore arm, you killed approx 5 hours, and you have a bligtastic rim to show for it. Now you repeat this process 3 more times and you're good to go. PM me with any questions and I'll be happy to try and answer any questions.
I hope this helps some of you out. I had fun doing it believe it or not (helps that I have a beer fridge in my garage LOL).
Last edited by WellFedHobo; 04-26-2014 at 09:08 AM. Reason: spelchak

Thread
Thread Starter
Forum
Replies
Last Post

