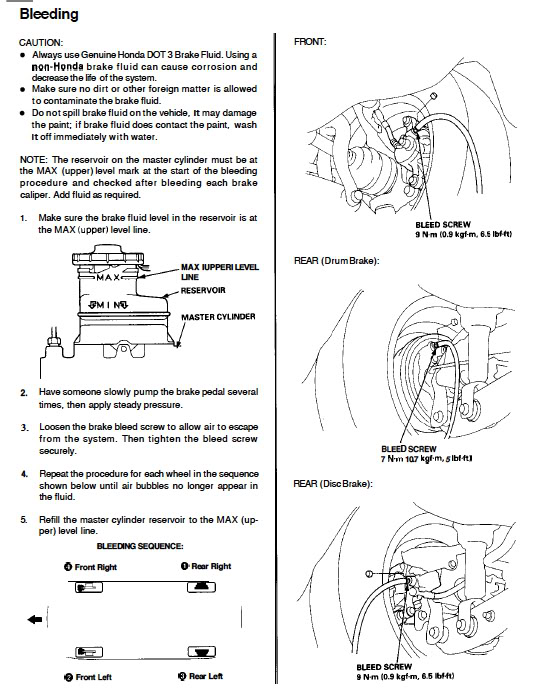
Brake Bleeding
#1
 05-24-2008, 12:16 PM


How often should you bleed your brakes?
Manufacturers usually specify that brakes should be bled every two years, starting from the date the vehicle was built. For race cars, it may be necessary to bleed the brakes before each track event and, if the pedal becomes soft during an event, it may even be necessary to bleed between sessions. If you find yourself bleeding the car between sessions, it's time to consider using a brake fluid with a higher boiling point, such as Motul 600 or Castrol SRF.
Why bleed brakes?
•Fresh brake fluid has a significantly higher boiling point than old fluid, allowing harder braking without fade. This is because brake fluid is hygroscopic and readily absorbs moisture. The more moisture in the fluid, the lower the boiling point.
•That same moisture promotes corrosion. Frequent bleeding with fresh fluid allows brake components to last longer. A well maintained brake system can help you avoid ever having to replace calipers, master cylinder or an expensive ABS control unit.
•The bleeding process, done properly, removes air bubbles from the hydraulic system, resulting in firmer brake pedal feel and more linear, responsive braking performance. Too much air in the system can be dangerous and result in the pedal sinking all the way to the floor. Air is compressible, brake fluid is not.
How much brake fluid is required?
It is usually possible to bleed all four corners of the car with somewhere between 1/2 and one liter of brake fluid. If you've just installed new brake lines or a big brake kit, it may require more fluid, especially if you are a novice at bleeding.
Must brakes be bled in a specific order?
Bleeding is done one wheel at a time. The "old timers" will tell you to start with the wheel furthest away from the master cylinder and then work your way closer. Typically, this would mean RR, LR, RF, then LF. However, it doesn't really matter if you start with the front or rear wheels, since they are on separate brake circuits on modern cars with ABS and/or dynamic stability control systems. However, you should start with the passenger side wheel and then do the driver's side.
How are brakes bled?
There are many techniques for bleeding brakes and lots of gadgets to make the job easier. For simply replacing old fluid with new, many of these techniques work well. But for removing air bubbles from the system, only one approach works. That is the old fashioned method, which requires an assistant to push on the brake pedal while the mechanic opens and closes the bleed valve on the calipers. This is the only way to generate a sufficient jolt to the brake fluid to knock loose those pesky bubbles and allow them to be flushed away. By following these instructions, you will be more likely to end up with a firm brake pedal, often with better feel than the day your car rolled off the assembly line.
Safety Warning: Working on your own car can be dangerous. Even quality jack stands can collapse if not positioned properly, and a floor jack can fail suddenly and without warning. You can be seriously injured or even killed if you do not follow proper safety procedures. Hondacivicforum.com assumes no liability expressed or implied for the improper use of these instructions.
1. Block a front wheel with a piece of wood to prevent the car from rolling. Raise the back of the car with a floor jack and then lower it onto a pair of jackstands.
2. Remove the rear wheels.
3. Open the brake fluid reservoir and remove as much old brake fluid as possible, using a suction tool or a turkey baster. Be careful not to spill any fluid, as it will dissolve the paint on your car.
4. Fill the brake reservoir to the top with fresh fluid.
5. Place a box end wrench over the bleed screw on the right rear caliper. Push a clear plastic tube over the nipple on the bleed screw and place the opposite end into a catch bottle. Auto parts stores sell nice catch bottles with a cover that prevents fluid from spilling if it tips over, a 1-way check valve in the cap, and a rubber fitting on the caliper end of the plastic line that snaps in place over a wide range of bleed screw nipple sizes.
6. Tell your assistant to pump the brake pedal a few times until it becomes firm. This is especially important if you have just replaced pads. If you've installed new stainless braided brake lines or installed a big brake kit, there may be enough air in the system that the brake pedal will not get firm. That's OK. Just move on to the next step.
7. Tap the caliper a few times with a rubber mallet or "dead-blow" hammer. This helps to knock loose air bubbles that may be clinging to inside surfaces of the caliper.
8. Have your assistant PUSH hard on the brake pedal and HOLD. With a quick motion, open the bleed screw about 1/4 turn. Fluid (and probably a few air bubbles) will flow through the plastic tube and into the catch bottle. A light placed behind the tube will make it easier to see what is coming out of the caliper.
9. Close the bleed screw just before the brake pedal reaches the floor. Don't worry if the timing is off at first. You will quickly figure it out with feedback from your assistant.
10. Tell your assistant to RELEASE.
11. Repeat steps 8 - 10. Do this about 6 times and then go to the front of the car to check the fluid level. You MUST NOT allow the level to fall to the point where you suck air into the master cylinder.
12. Top off the brake fluid level and continue for a total of about 10 pumps or until you no longer see any air bubbles coming out of the caliper.
13. Repeat the process for the other rear caliper.
14. Make sure both calipers are wiped clean of brake fluid and that none has spilled on the rotors or pads. Use brake cleaning spray if necessary. Reinstall the rear wheels and torque to factory specification, then lower car to the ground
15. Now apply the parking brake, put the car in gear (or PARK) and raise the front of the car with your floor jack. Lower it onto a pair of jackstands.
16. Remove the front wheels.
17. Follow the exact same technique as with the rear wheels, starting with the passenger side caliper. The fluid will flow more rapidly out of the front calipers, so you will need to check the level in the brake fluid reservoir more frequently to avoid letting it drop too low.
18. Reinstall and torque the front wheels, then lower the car to the ground.
19. Top off the brake fluid reservoir and replace the cap.
Last edited by trustdestruction; 02-24-2010 at 09:25 PM.

#4
08-15-2008, 05:21 PM
#5
11-06-2008, 11:58 AM

That's a good trick with the dead-blow hammer, I'll use that next time.
I'd like to add that you should never *pump* the pedal quickly when bleeding.
Always move the pedal slowly, up or down. Fast pumping creates micro-bubbles in the fluid that won't come out till later.
I've used the little one-person bleeder bottles with good results, but you have to empty them frequently.
I've also used my friends pistol-grip suction bleeder and it worked very well.

#7
11-29-2009, 12:38 AM

it looks like i have
unknown pads
stock oem rotors
and idk how good they work since my system is full of air and barely stops haha
anyone wanna help me bleed my damn brakes?
unknown pads
stock oem rotors
and idk how good they work since my system is full of air and barely stops haha
anyone wanna help me bleed my damn brakes?

Thread
Thread Starter
Forum
Replies
Last Post
56kz2slow
Suspension, Brakes, Tires & Wheels
0
04-10-2005 07:00 PM