Acura Integra Gauge Cluster Installation (92-95 Civic)
#1
 10-29-2008, 10:03 PM


This is a detailed DIY for installing a 94-01 Integra Cluster into a 92-95 Civic. You are more that welcome to use this as a guideline as there are many ways of displaying the cluster.
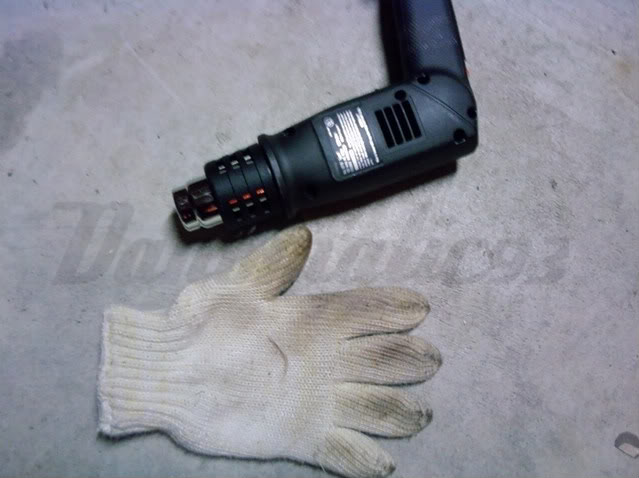
Tools/Items Used:
Knife (Small Flat Head Driver)
Masking Tape
Heat Gun
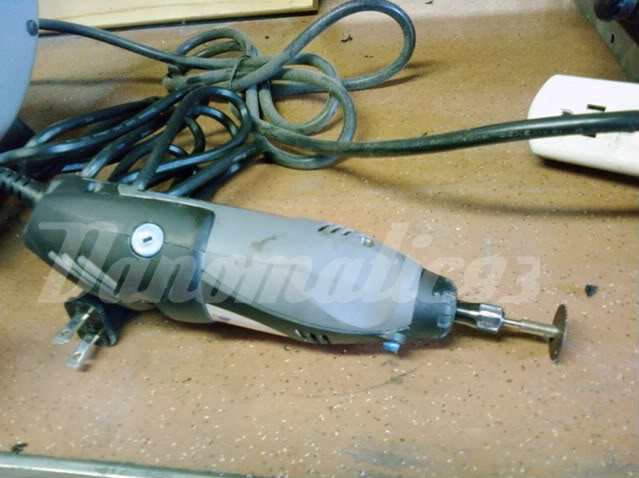
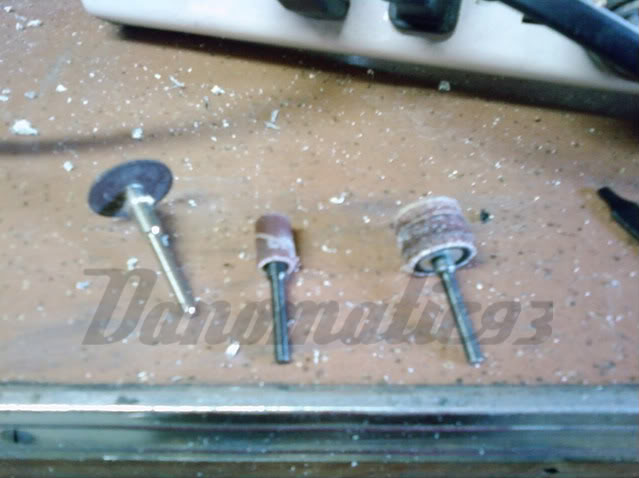
Dremel (Cutting and Sanding Bits)
Ove Glove
Safety Glasses
94-01 Integra Cluster with Pigtails (I used a 94-97 Cluster)
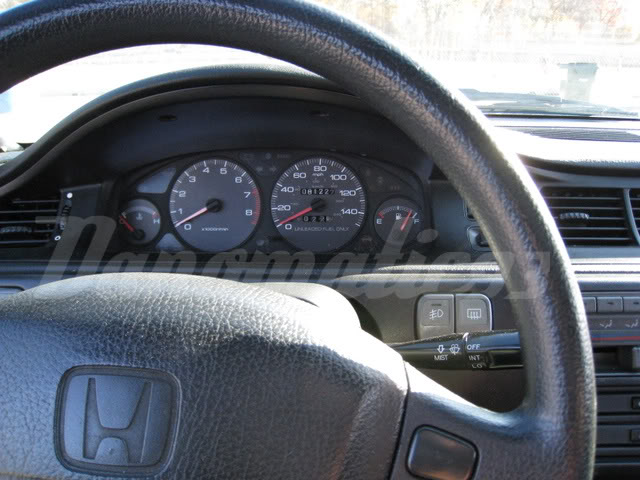
92-95 Civic Cluster Bezel
Acrylic (Plexiglas)
Epoxy
Flat Black Spray Paint
Sandpaper
Small piece of a paperclip
EG trip odometer stick rubber end
1” nylon sleeve with O.D. �” and 6-32 thread size inside
2” 6-32 threaded rod
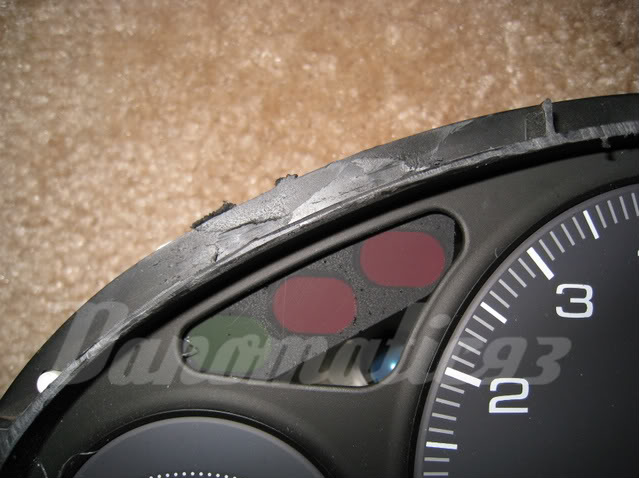
Civic Cluster Bezel Preparation:
Let’s start by getting the Civic Cluster Bezel ready. I wanted the have a clean stock feel with these gauges, so I wanted to use a stock bezel (well, really just the frame of it.).
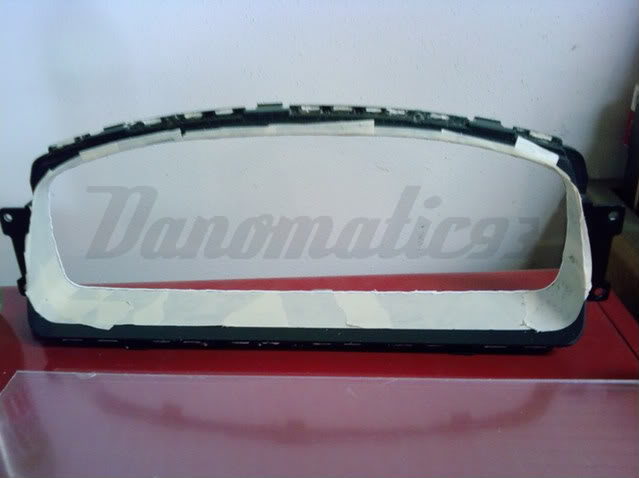
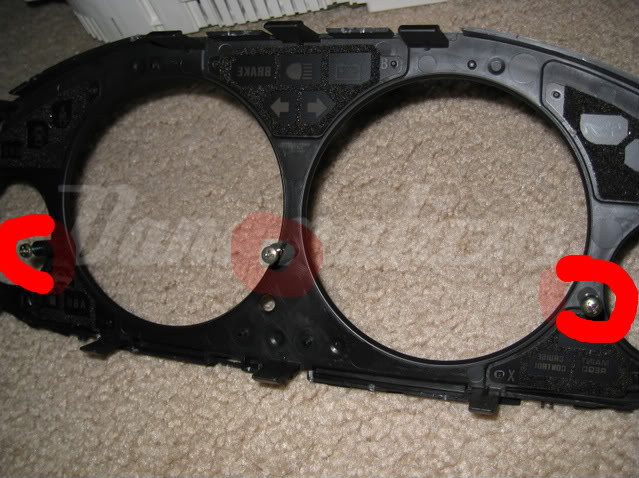
1. Remove the Bezel from the donor Cluster. 5 tabs, use ‘em.

2. With a knife, shove it in between the Bezel and the plastic cover. Work your way around the cover, carefully prying up the cover as you go.
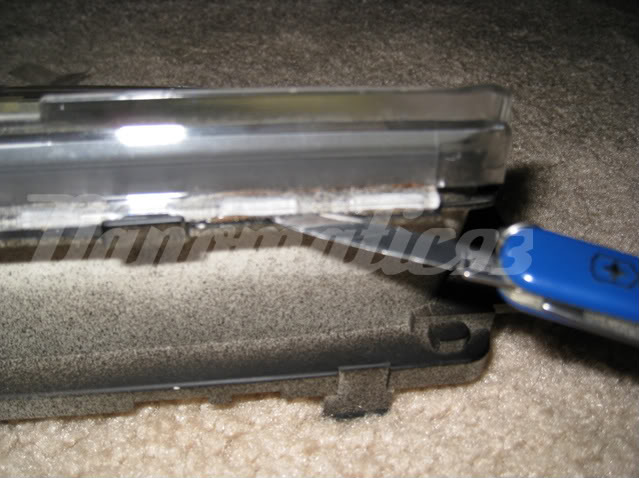
3. Mask off the inside of the Bezel with tape to protect it from scratches later.
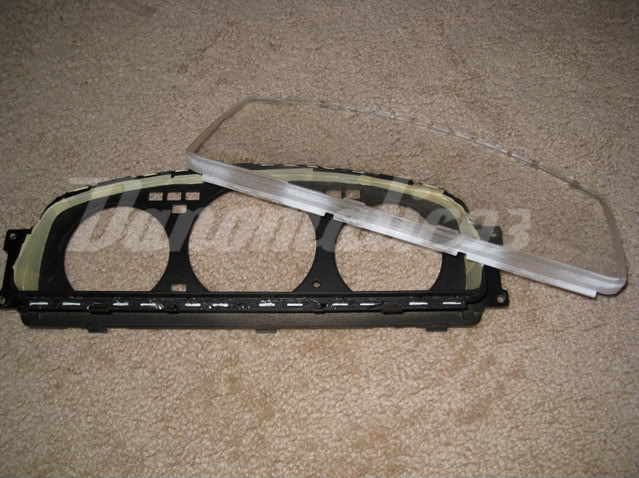
4. Get out the Dremel and cutting disc and cut it out. Leave extra material to sand down so that you don’t scar the Bezel.
WEAR SAFTEY GLASSES!!
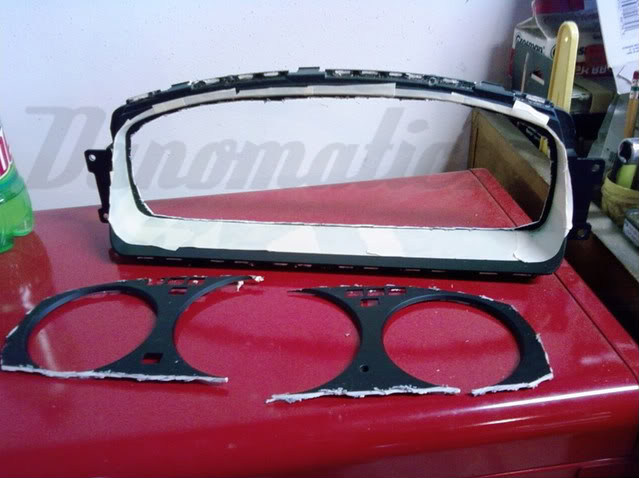
You can see how much I left to sand here:
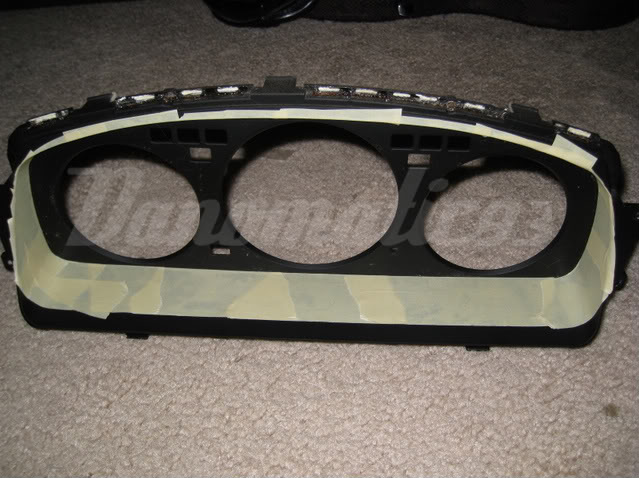
5. Again with the Dremel, but now with the sanding tubes. Sand it flush.
Note: I also hand sanded with 180, 360 and 600 grit sand paper after using the dremel.
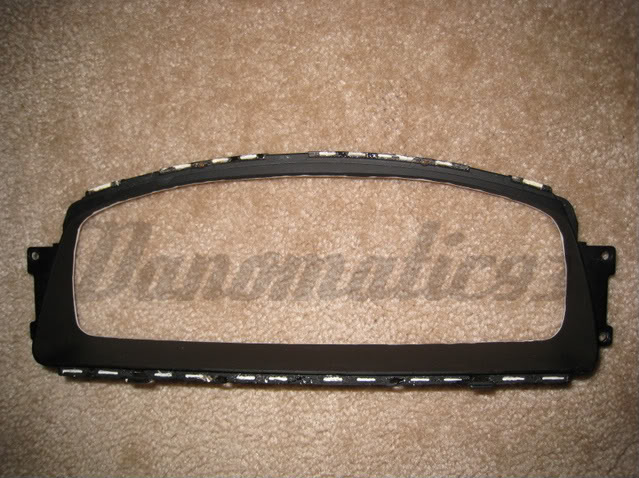
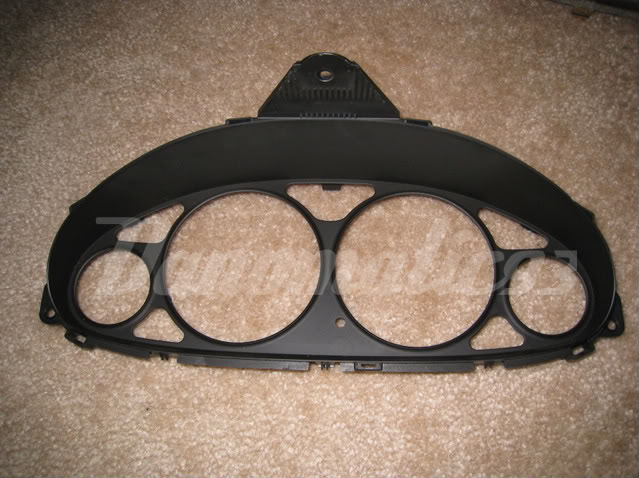
6. Trim three tabs of the Bezel.
Before:
After:
7. Lightly scuff the surface with fine grit sandpaper (600+), clean with alcohol and let it dry, then paint flat black.
Integra Cluster Preparation:
Get out the Integra Cluster
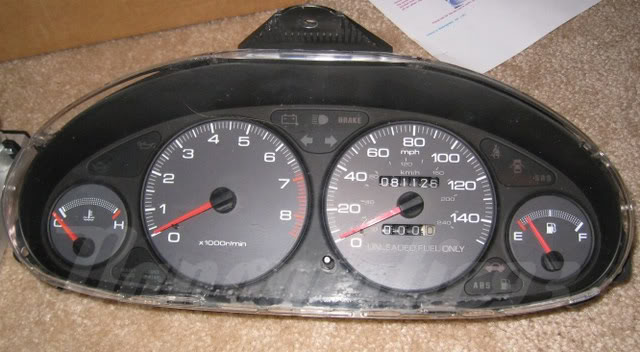
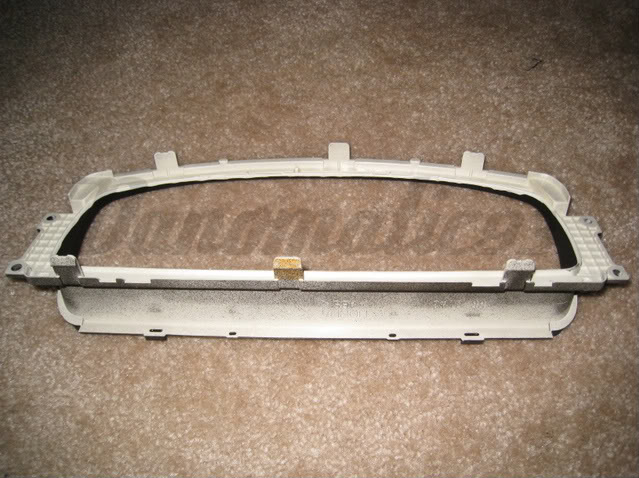
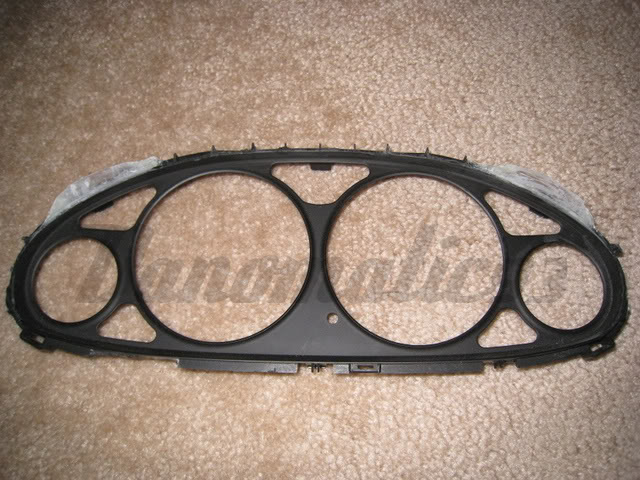
1. Remove the Bezel on the Integra. Tabs and 3 screws in the back!
2. With the Bezel off, remove the clear cover and cut the Bezel with a Dremel.
Note: the Bezel is on the cluster just for the picture; do not cut with the Bezel on the cluster. You will screw up!
Note: I cut down some fins on each side.
Note: I trimmed this lower part of the Bezel to allow the Civic Bezel to sit on this Bezel more easily.
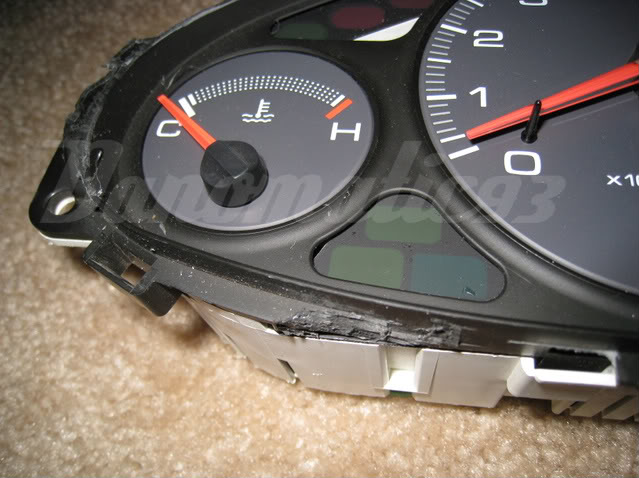
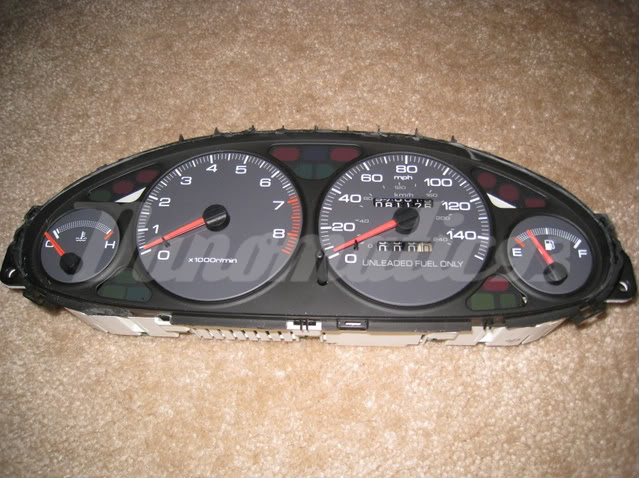
To fit the cluster into the car I had to cut down the cluster’s sides a little. Both sides were cut the same.
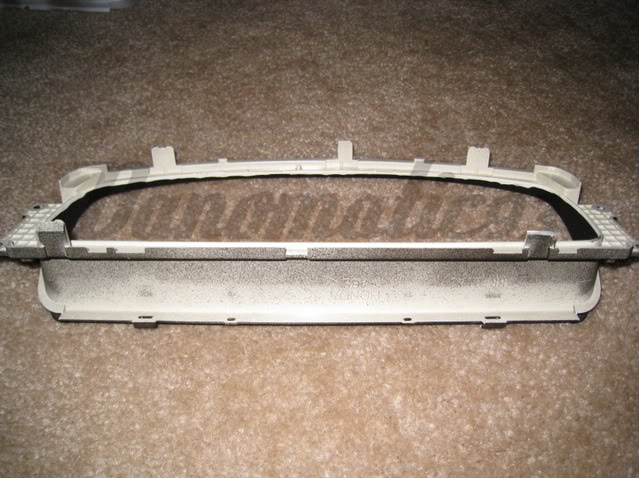
3. Test fit, Test fit, Test fit!!!
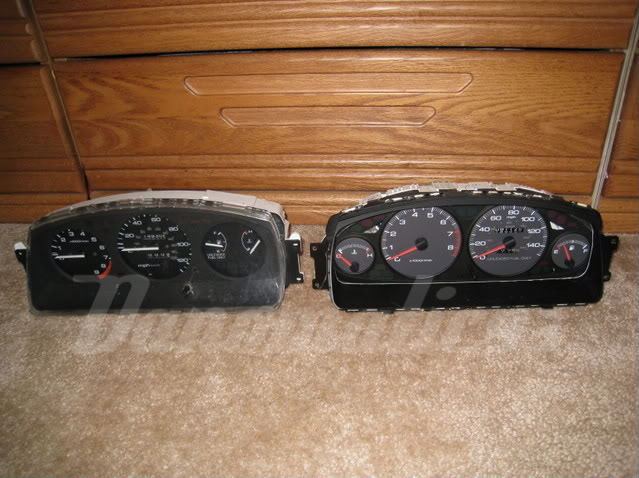
Stop and admire a side by side.
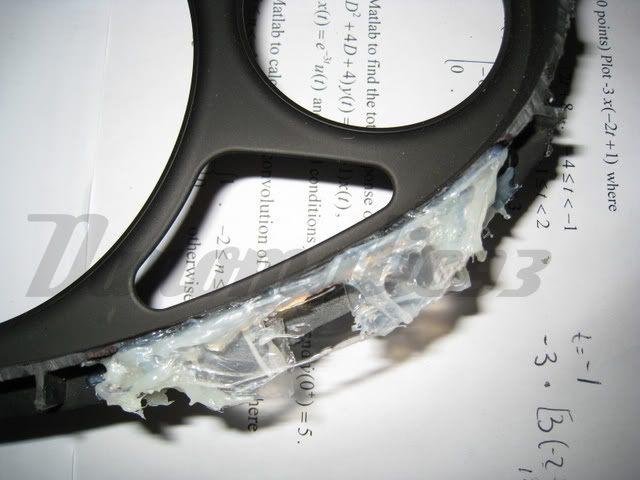
4. Add extra material on the upper corners of the bezel where there is a gap between the integra bezel and civic bezel.
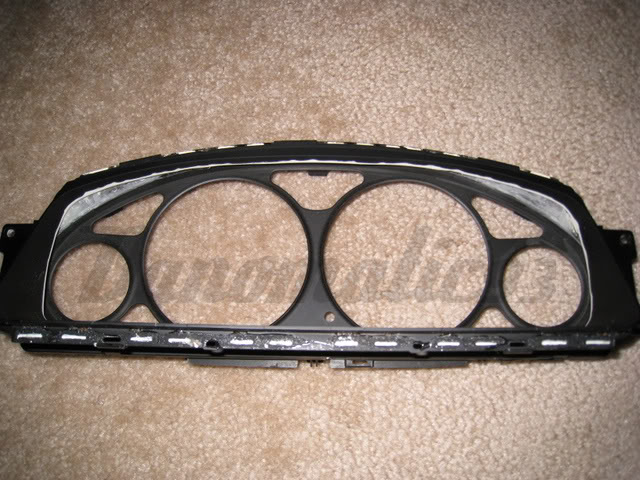
Note: I used extra Plexiglas and epoxy then sanded it flat.
5. Lightly scuff the surface with fine grit sandpaper (600+), clean with alcohol and let it dry, then paint flat black.
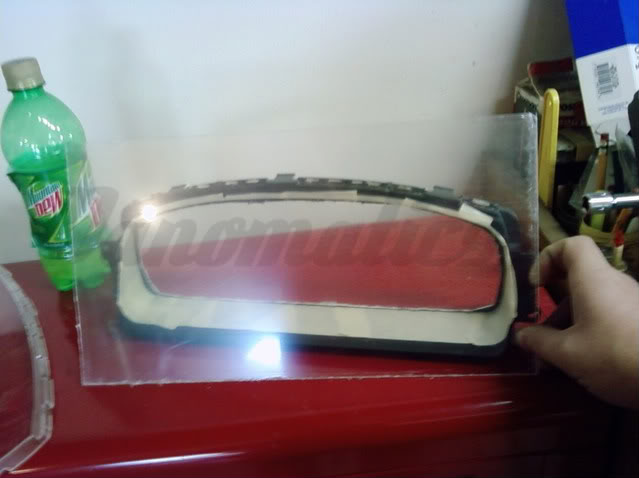
It should look something like this:
6. Extending the trip odometer stick:
Random parts I used:
-a small piece of a paperclip
-EG trip odometer stick rubber end
-1” nylon sleeve with O.D. �” and 6-32 thread size inside
-2” 6-32 threaded rod
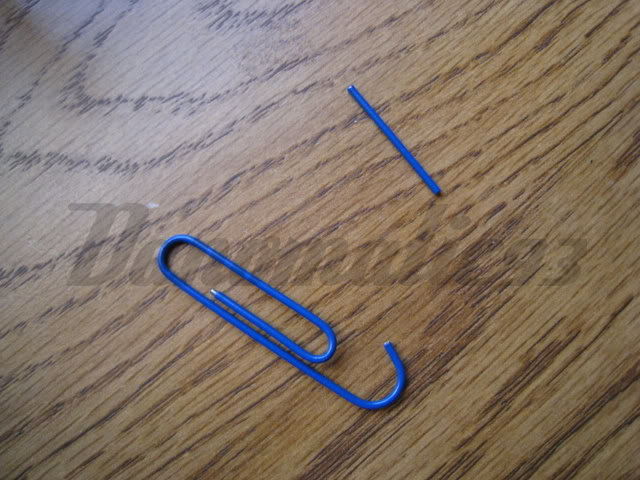
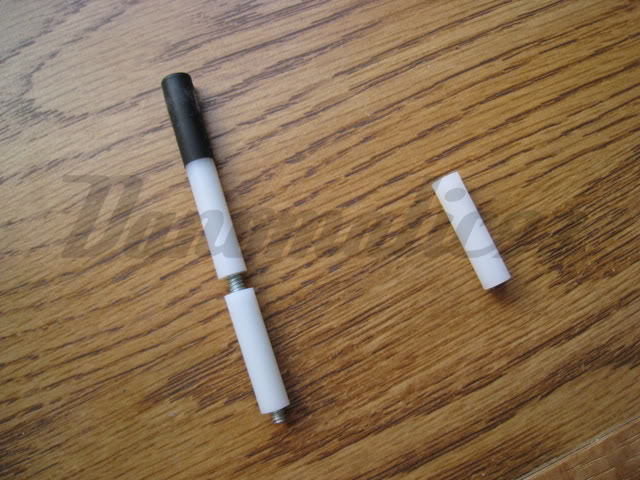
To do it:
a. Drill a small hole in the Integra trip stick to receive half of the length of the paperclip piece you cut. This is used allow the extension something to hold onto.
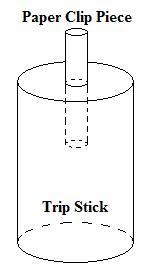
b. Epoxy the paperclip piece in place.
c. Push the EG trip end onto the threaded rod.
d. Cut down the threaded rod a little. Be sure the nylon sleeve can still thread on.
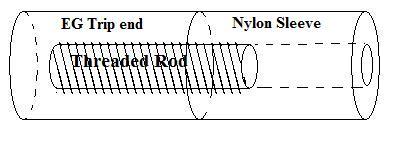
e. Now, you can epoxy the extension on OR build up the diameter of the paperclip with epoxy so that the extension slides on snugly without being permanently attached.
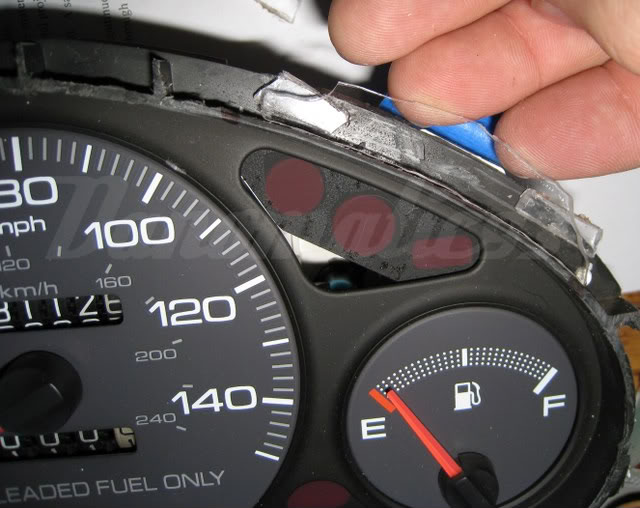
Custom Cluster Cover Preparation:
We want our final product to have a hole for the trip odometer reset stick to be in the right spot. Yes, you can use the stock cover BUT, you’ll have a hole in the wrong spot. So, let’s make our own cover!
Get some acrylic (Plexiglas) from your local hardware store.
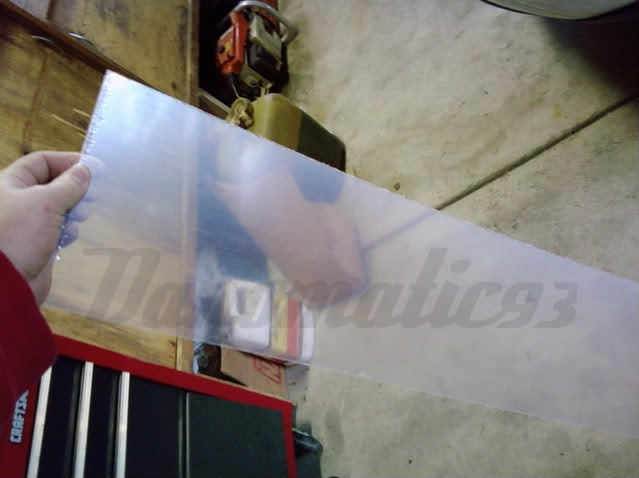
1. Cut the Plexiglas to rough length. Notice that it’s flat, for now.
2. Pull out the Ove Glove and Heat Gun and begin to evenly heat the Plexiglas.
3. While heating the Plexiglas apply pressure by bending it slowly. Do this until it has the same curvature as the stock cover.
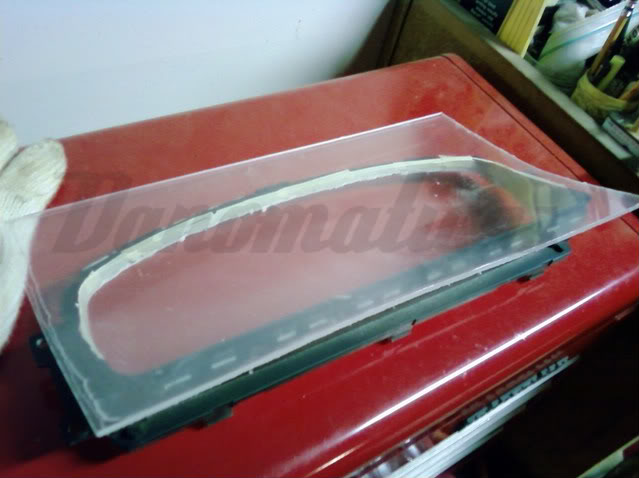
4. Cut the Plexiglas to rough shape.
5. Cut the whole for your extended trip odometer stick.
6. Remove the protective plastic on both side of the Plexiglas. TIP: if it doesn’t come off easily, soak the cover in water for 5-10 minutes.
7. Epoxy the Plexiglas cover on and trim it down if you need.
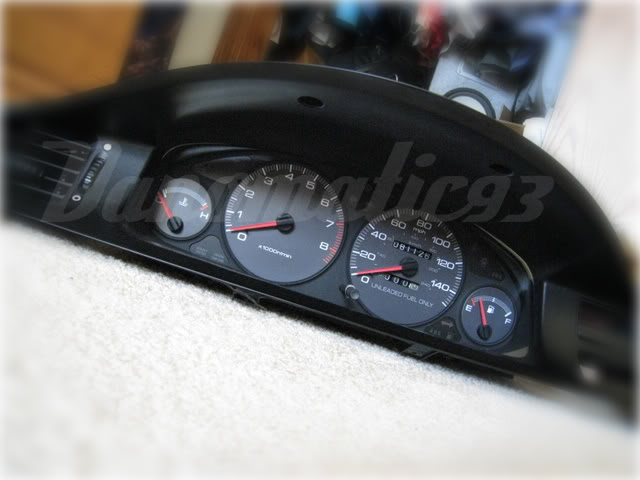
Getting the bezels together:
1. Epoxy them where you see fit.
Wiring:
Wiring charts found on Honda-Tech:
http://honda-tech.com/zerothread?id=1053318
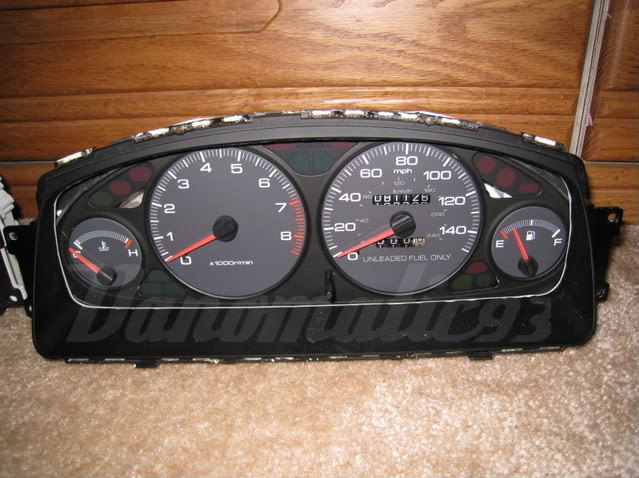
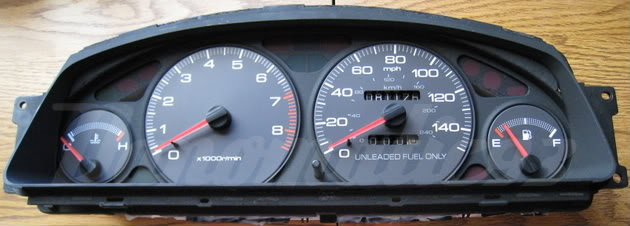
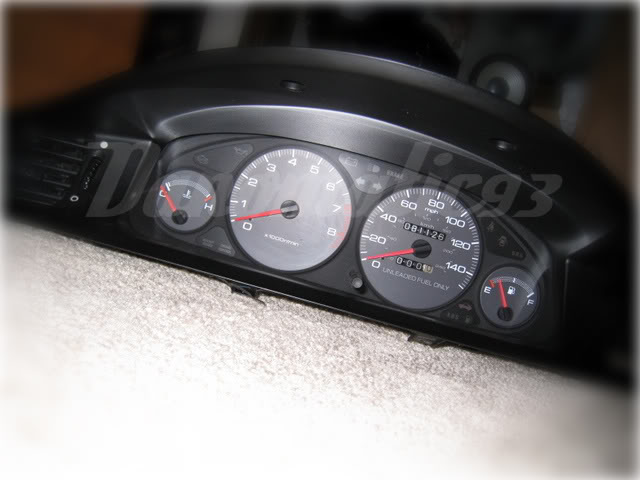
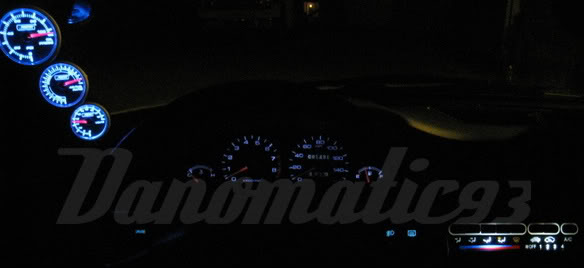
The Final Product:
Tools/Items Used:
Knife (Small Flat Head Driver)
Masking Tape
Heat Gun
Dremel (Cutting and Sanding Bits)
Ove Glove
Safety Glasses
94-01 Integra Cluster with Pigtails (I used a 94-97 Cluster)
92-95 Civic Cluster Bezel
Acrylic (Plexiglas)
Epoxy
Flat Black Spray Paint
Sandpaper
Small piece of a paperclip
EG trip odometer stick rubber end
1” nylon sleeve with O.D. �” and 6-32 thread size inside
2” 6-32 threaded rod
Civic Cluster Bezel Preparation:
Let’s start by getting the Civic Cluster Bezel ready. I wanted the have a clean stock feel with these gauges, so I wanted to use a stock bezel (well, really just the frame of it.).
1. Remove the Bezel from the donor Cluster. 5 tabs, use ‘em.
2. With a knife, shove it in between the Bezel and the plastic cover. Work your way around the cover, carefully prying up the cover as you go.
3. Mask off the inside of the Bezel with tape to protect it from scratches later.
4. Get out the Dremel and cutting disc and cut it out. Leave extra material to sand down so that you don’t scar the Bezel.
WEAR SAFTEY GLASSES!!
You can see how much I left to sand here:
5. Again with the Dremel, but now with the sanding tubes. Sand it flush.
Note: I also hand sanded with 180, 360 and 600 grit sand paper after using the dremel.
6. Trim three tabs of the Bezel.
Before:
After:
7. Lightly scuff the surface with fine grit sandpaper (600+), clean with alcohol and let it dry, then paint flat black.
Integra Cluster Preparation:
Get out the Integra Cluster
1. Remove the Bezel on the Integra. Tabs and 3 screws in the back!
2. With the Bezel off, remove the clear cover and cut the Bezel with a Dremel.
Note: the Bezel is on the cluster just for the picture; do not cut with the Bezel on the cluster. You will screw up!
Note: I cut down some fins on each side.
Note: I trimmed this lower part of the Bezel to allow the Civic Bezel to sit on this Bezel more easily.
To fit the cluster into the car I had to cut down the cluster’s sides a little. Both sides were cut the same.
3. Test fit, Test fit, Test fit!!!
Stop and admire a side by side.
4. Add extra material on the upper corners of the bezel where there is a gap between the integra bezel and civic bezel.
Note: I used extra Plexiglas and epoxy then sanded it flat.
5. Lightly scuff the surface with fine grit sandpaper (600+), clean with alcohol and let it dry, then paint flat black.
It should look something like this:
6. Extending the trip odometer stick:
Random parts I used:
-a small piece of a paperclip
-EG trip odometer stick rubber end
-1” nylon sleeve with O.D. �” and 6-32 thread size inside
-2” 6-32 threaded rod
To do it:
a. Drill a small hole in the Integra trip stick to receive half of the length of the paperclip piece you cut. This is used allow the extension something to hold onto.
b. Epoxy the paperclip piece in place.
c. Push the EG trip end onto the threaded rod.
d. Cut down the threaded rod a little. Be sure the nylon sleeve can still thread on.
e. Now, you can epoxy the extension on OR build up the diameter of the paperclip with epoxy so that the extension slides on snugly without being permanently attached.
Custom Cluster Cover Preparation:
We want our final product to have a hole for the trip odometer reset stick to be in the right spot. Yes, you can use the stock cover BUT, you’ll have a hole in the wrong spot. So, let’s make our own cover!
Get some acrylic (Plexiglas) from your local hardware store.
1. Cut the Plexiglas to rough length. Notice that it’s flat, for now.
2. Pull out the Ove Glove and Heat Gun and begin to evenly heat the Plexiglas.
3. While heating the Plexiglas apply pressure by bending it slowly. Do this until it has the same curvature as the stock cover.
4. Cut the Plexiglas to rough shape.
5. Cut the whole for your extended trip odometer stick.
6. Remove the protective plastic on both side of the Plexiglas. TIP: if it doesn’t come off easily, soak the cover in water for 5-10 minutes.
7. Epoxy the Plexiglas cover on and trim it down if you need.
Getting the bezels together:
1. Epoxy them where you see fit.
Wiring:
Wiring charts found on Honda-Tech:
http://honda-tech.com/zerothread?id=1053318
The Final Product:
Last edited by WellFedHobo; 01-30-2010 at 12:36 PM.


#4
10-30-2008, 10:08 PM
For any EK (96-00) it would be a hell of a lot easier. You can re-pin the plugs (pigtails), the cluster fits in as is with minor modification. I don't know the specifics though, just google it.

#7
12-02-2008, 06:30 PM
My digital camera doubles as a video camera and has the feature of time lapse. It's actually a big reason I bought it.

Thread
Thread Starter
Forum
Replies
Last Post
trustdestruction
Audio/Video & Electronics DIYs
0
11-26-2008 02:03 PM
1998wagonhatch
PRIVATE For Sale / Trade Classifieds
2
08-15-2005 03:36 PM

