
LED Gauge Cluster & Dash Lighting (92-95 Civic)


Thread Starter
|
June 2010 ROTM
Joined: Oct 2006
Posts: 3,284
From: Milwaukee, WI
I did this write-up because I couldn't find half of this info anywhere. So, here you go.
Cluster LEDs:
Let�s start with the easiest modification, replacing your cluster�s stock bulbs with bright LEDs, of any color, to give your Civic a new look.
You�ll need 6 LEDs. I went with T1.5 #74 LEDs installed in a twist lock socket base from superbrightleds.com. You will need to reuse one of the stock bulb�s sockets. (more about that later)
1.
Remove the cluster.
(Quick summary: pop out hazard switch and unplug, unscrew screw behind hazard switch and the 2 screws in the bezel above the cluster, pull out bezel and unplug clock, unscrew the 4 screws holding the cluster in, and plug the cluster and remove.)
2.
Viewing the back of the cluster:
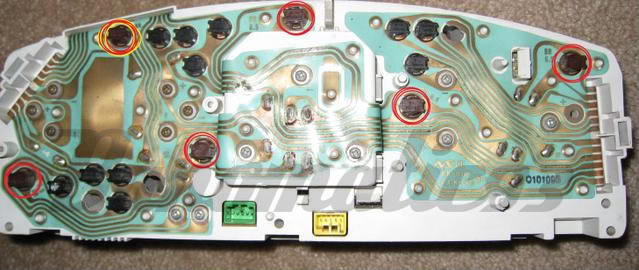
Remove the bulbs circled in red. Remove the bulb circled in yellow and red and set it aside for now.
3.
You can install your new LEDs in the red circled locations now.
4.
The location circled in yellow and red is smaller than the rest. For this reason, you�ll need to reuse the stock bulb socket that you set aside previously. Pull the stock bulb out of its socket. Do the same with an LED. Now push the LED into the stock socket and install the LED.
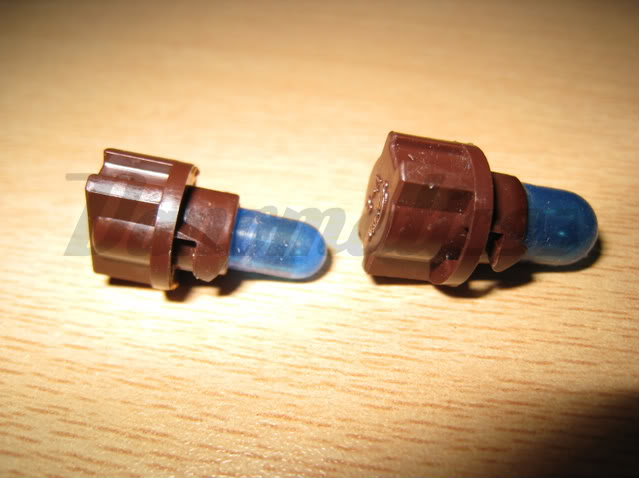
Here are the stock bulbs and sockets. The one on the Left is the small one.
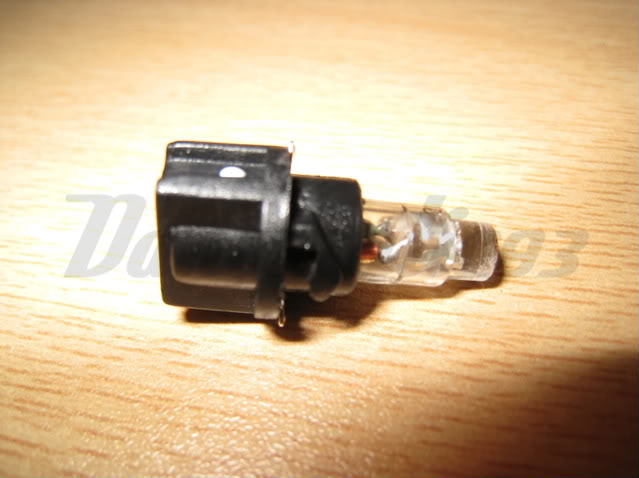
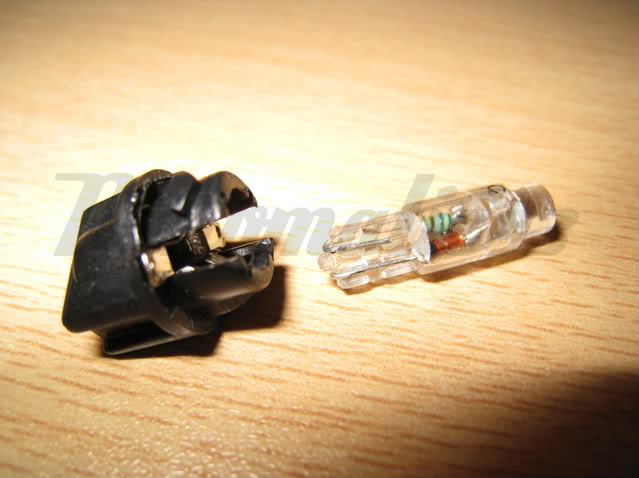
Here is the LED and socket. And second image is the LED removed from the socket.
5.
Now, these LEDs are polarized, meaning they only work in one direction. So, test that they are working. To test, plug the cluster back in, turn on the lights. If an LED isn�t lit, remove it, turn it 180 degrees and reinsert.
Done!
Dash Switches and Climate Control LEDs:
Now that your cluster is looking like a new Audi, your dash switches and Climate Controls are now looking faded and old. Let�s change that!
All the switches use 3mm Neo-Wedges. There are 6 total. The Climate control uses #74 LEDs.
Start with the switches:
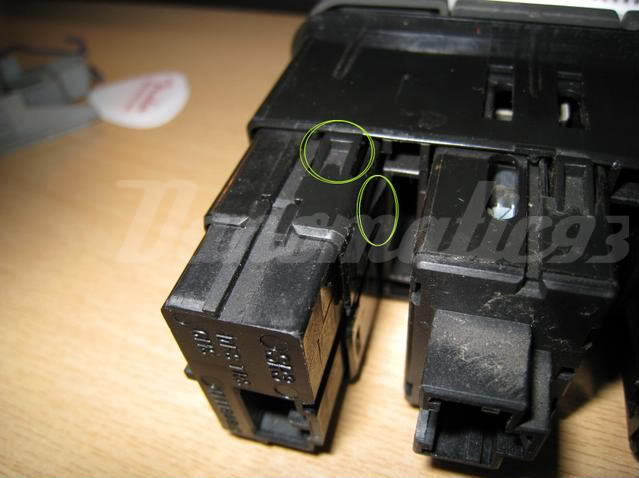
1.
Remove the switch that you intend to replace the bulb with.
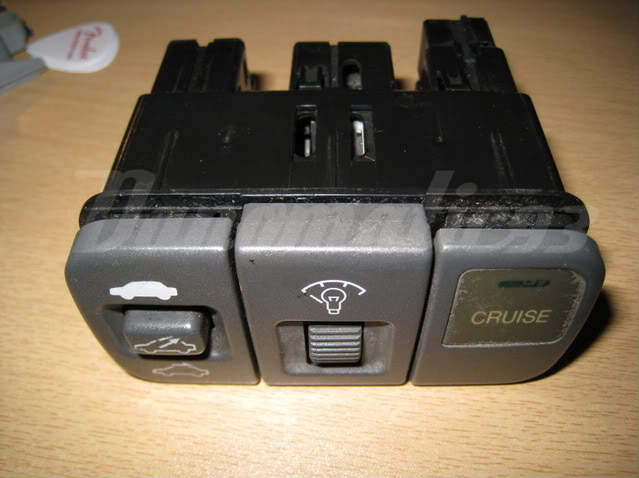
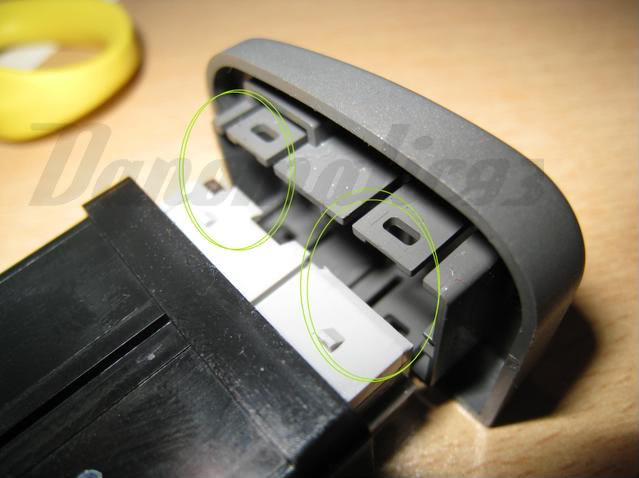
There are 4 tabs that hold each switch in the housing. (2 are circled in green). Push in the tabs and pull out the switch.
2.
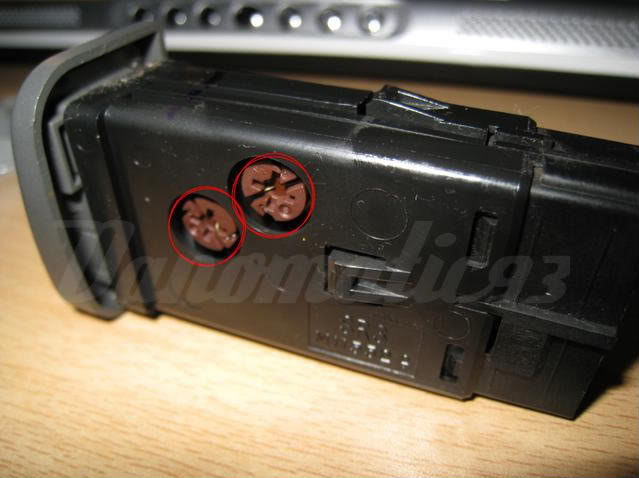
Then you have an option.
a.
You can try to get out the bulbs (circled in red) as they are [then, skip to step 3]
OR
b.
you can go further and open up the switch to easily remove the bulbs.
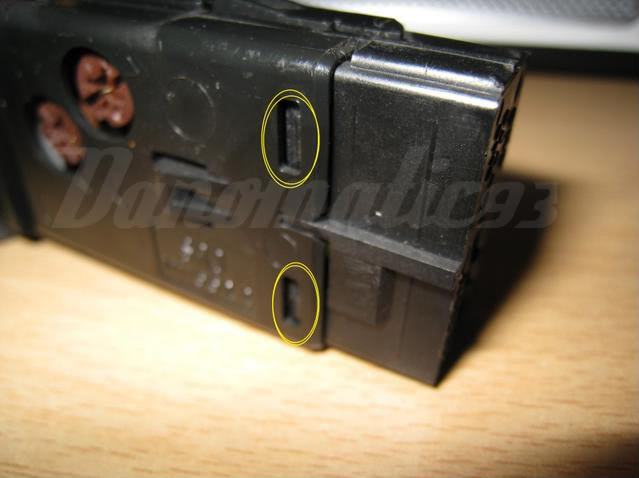
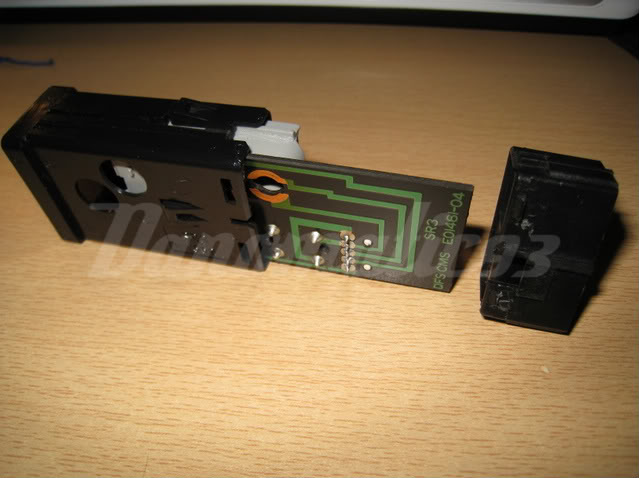
i.
To open the switch up, start by removing the back. There are 4 tabs (2 are circled in yellow) holding the back on.
ii.
Then remove the face of the switch. There are again 4 tabs holding the face on (circled in green).
iii.
Now, the internals will slide out and you will be able to easily remove the bulbs.
Here's a video showing the same thing:

3.
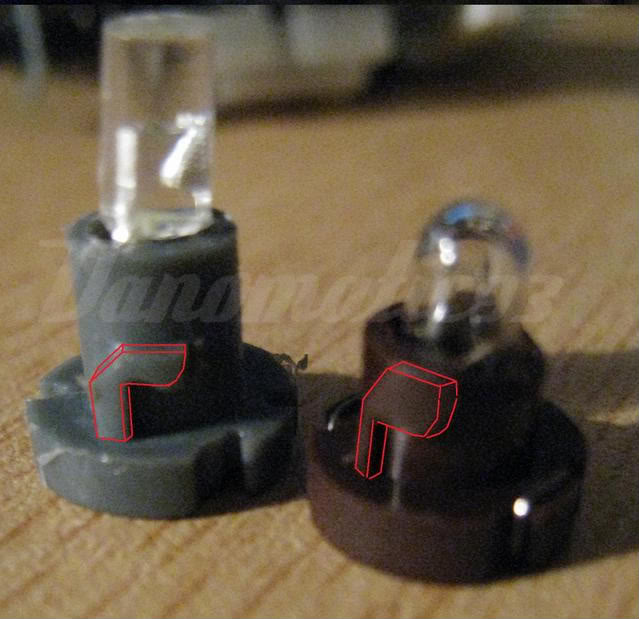
You will be using 6 Neo-Wedge LEDs sized 3mm. They will not fit into the socket without altering the lock tabs slightly.
(Stock bulb on Right, LED on Left)

Use a razor blade to cut off 3 spots on the LED�s lock tabs.
In this diagram, not the stock tab on the left and the LED�s tab on the right. Carefully, remove the blue sections with the razor blade.

They should look like this now.
4.
Remember now, that these LEDs are polarized, meaning they only work one way. So, before you assemble the switches back together, test that the LEDs are installed correctly.
5.
For the Climate Control LEDs, reference Addiction2Bass�s DIY to disassemble the unit. https://www.hondacivicforum.com/foru...ad.php?t=58988
Once you get to the stock bulbs, simply remove them and replace with the #74 LEDs.
Done!!
Here's a look at the final product:
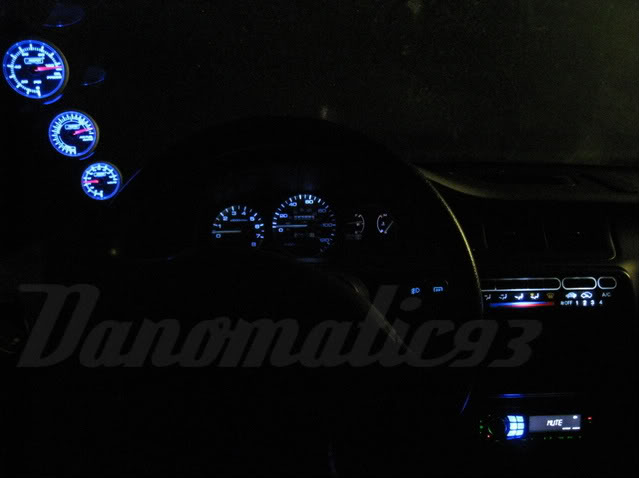

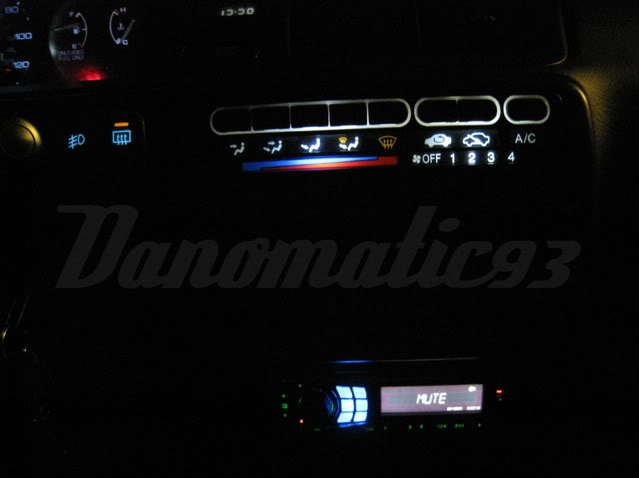
I used Bright White for the cluster, climate controls, and switch function images. I used green and amber for the switch indicator lights.
Obviously, you can do the whole amber thing, or whatever color(s) you want!
Cluster LEDs:
Let�s start with the easiest modification, replacing your cluster�s stock bulbs with bright LEDs, of any color, to give your Civic a new look.
You�ll need 6 LEDs. I went with T1.5 #74 LEDs installed in a twist lock socket base from superbrightleds.com. You will need to reuse one of the stock bulb�s sockets. (more about that later)
1.
Remove the cluster.
(Quick summary: pop out hazard switch and unplug, unscrew screw behind hazard switch and the 2 screws in the bezel above the cluster, pull out bezel and unplug clock, unscrew the 4 screws holding the cluster in, and plug the cluster and remove.)
2.
Viewing the back of the cluster:
Remove the bulbs circled in red. Remove the bulb circled in yellow and red and set it aside for now.
3.
You can install your new LEDs in the red circled locations now.
4.
The location circled in yellow and red is smaller than the rest. For this reason, you�ll need to reuse the stock bulb socket that you set aside previously. Pull the stock bulb out of its socket. Do the same with an LED. Now push the LED into the stock socket and install the LED.
Here are the stock bulbs and sockets. The one on the Left is the small one.
Here is the LED and socket. And second image is the LED removed from the socket.
5.
Now, these LEDs are polarized, meaning they only work in one direction. So, test that they are working. To test, plug the cluster back in, turn on the lights. If an LED isn�t lit, remove it, turn it 180 degrees and reinsert.
Done!
Dash Switches and Climate Control LEDs:
Now that your cluster is looking like a new Audi, your dash switches and Climate Controls are now looking faded and old. Let�s change that!
All the switches use 3mm Neo-Wedges. There are 6 total. The Climate control uses #74 LEDs.
Start with the switches:
1.
Remove the switch that you intend to replace the bulb with.
There are 4 tabs that hold each switch in the housing. (2 are circled in green). Push in the tabs and pull out the switch.
2.
Then you have an option.
a.
You can try to get out the bulbs (circled in red) as they are [then, skip to step 3]
OR
b.
you can go further and open up the switch to easily remove the bulbs.
i.
To open the switch up, start by removing the back. There are 4 tabs (2 are circled in yellow) holding the back on.
ii.
Then remove the face of the switch. There are again 4 tabs holding the face on (circled in green).
iii.
Now, the internals will slide out and you will be able to easily remove the bulbs.
Here's a video showing the same thing:
3.
You will be using 6 Neo-Wedge LEDs sized 3mm. They will not fit into the socket without altering the lock tabs slightly.
(Stock bulb on Right, LED on Left)
Use a razor blade to cut off 3 spots on the LED�s lock tabs.
In this diagram, not the stock tab on the left and the LED�s tab on the right. Carefully, remove the blue sections with the razor blade.
They should look like this now.
4.
Remember now, that these LEDs are polarized, meaning they only work one way. So, before you assemble the switches back together, test that the LEDs are installed correctly.
5.
For the Climate Control LEDs, reference Addiction2Bass�s DIY to disassemble the unit. https://www.hondacivicforum.com/foru...ad.php?t=58988
Once you get to the stock bulbs, simply remove them and replace with the #74 LEDs.
Done!!
Here's a look at the final product:
I used Bright White for the cluster, climate controls, and switch function images. I used green and amber for the switch indicator lights.
Obviously, you can do the whole amber thing, or whatever color(s) you want!


Thread
Thread Starter
Forum
Replies
Last Post
theonecalledtodd
Mechanical Problems & Technical Chat
2
Jun 8, 2009 05:31 PM
addiction2bass
Interior DIYs
1
Sep 25, 2008 11:41 AM
ltkenbo
Interior DIYs
0
Aug 10, 2007 12:32 AM