
Tiran's EJ6; 4 Doors of Fury


Thread Starter
|
HCF Member
Joined: Sep 2008
Posts: 263
From: CANADA!!!
I figure I should probably start one of these, since I will be slowly modifying my car depending on how funds come in.
The Car
I bought my 1997 Honda Civic EX 4 door in December 2007 when my Topaz�s transmission decided it only liked to run my car in first gear. I bought it with 227xx kilometers on its d16y7 engine. Remember I am in Canada so my ex is equivalent to a US spec LX.
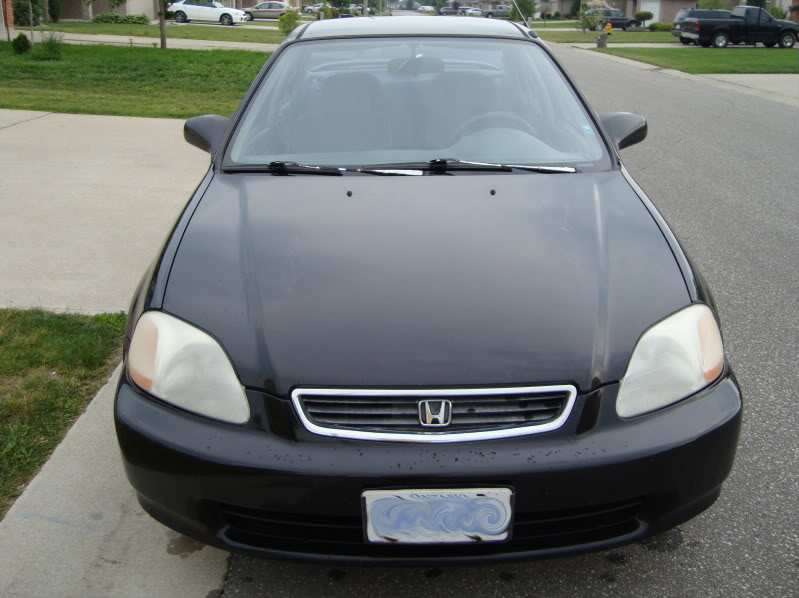
Front view
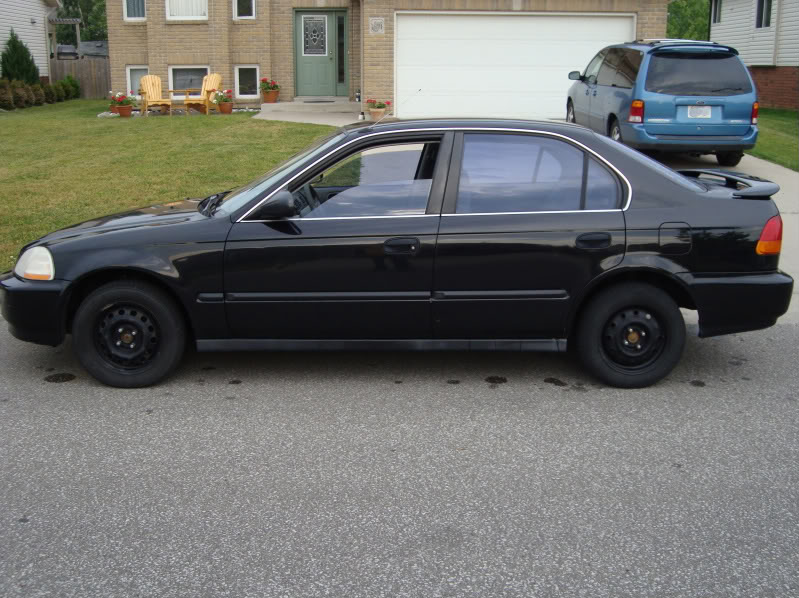
Left Side
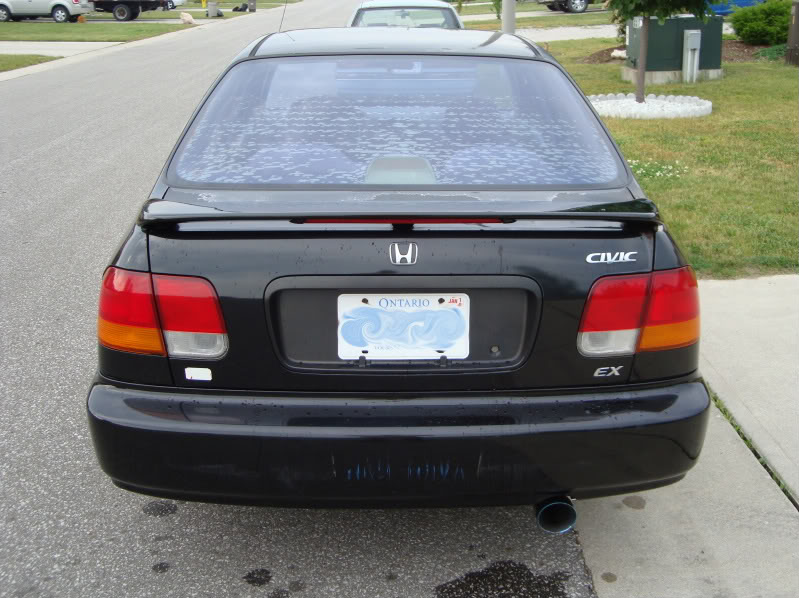
Rear
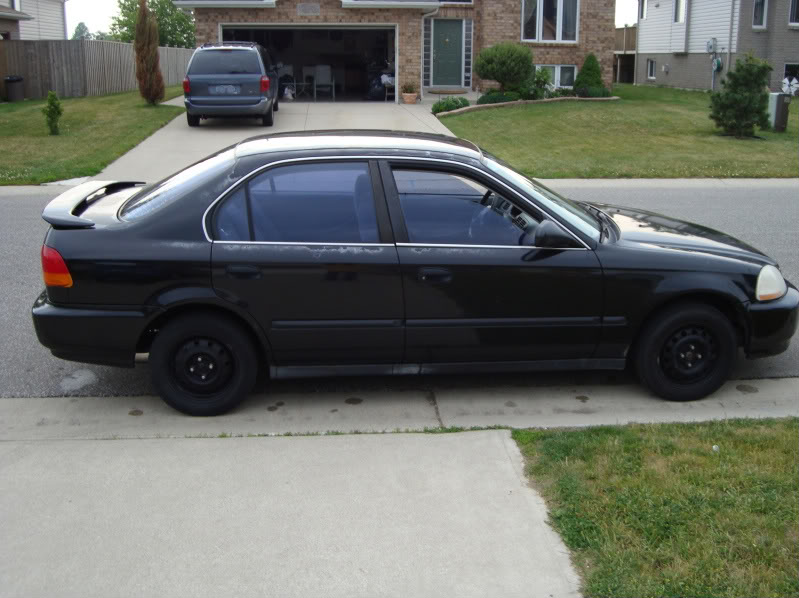
Right Side
Angled/Action Shot =P
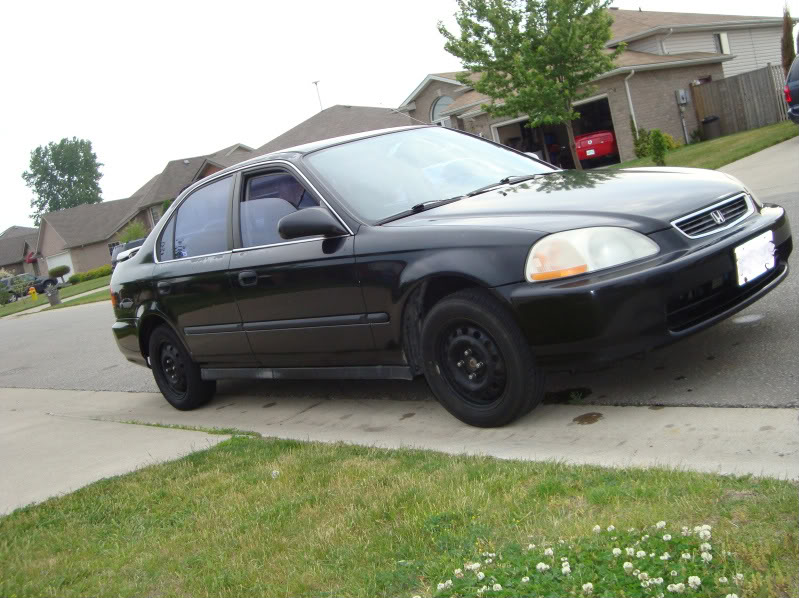
The paint is pretty bad and I had to replace the clutch after a month, granted it still had the stock clutch so really nothing to surprising there. Otherwise car runs great and when I took it on a 20 hour road trip I had no problems with it.
Last November (2008), I had the rear quarter panels/fenders redone due to rusting. They now look amazing.
The Plan
Being the way I am, I cannot leave well enough alone. I swore I would not modify this car but�.yeah that is not going to happen.
The overarching goals of this project Are to have a car that is practicle and yet still fun to drive and reliable.
Stage 1
Engine & Transmission
PRM Racing Intake
Megan 4-2-1 SS header (Installed June 3, 2009)
Magnaflow High flow Catalytic converter (Installed June 3, 2009)
Greddy Spectrum Elite Cat-back exhaust (Installed June 3, 2009)
Short Throw shift (not sure on brand)
Exterior
New OEM front and rear bumpers
Front and rear Lips (not sure on style)
Projector headlights (Installed July 22, 2009)
Stripped, any rust and dents fixed and repainted black
Tinting redone
Clear OEM style fog lights
Seibon OEM Style Carbon Fiber hood
Interior
Bride Gias seats
Kenwood Excelon KDA-X692 head unit (Installed March 2009)
Infinity Kappa 62.9I 6.5s front
Infinity Kappa 692.9I 6x9s rear
Suspension
KYB AGX Struts
Spoon progressive Springs
Buddy Club P-1 Racing SF Gunmetal Wheels (not sure on 15s or 16s)
Buddy Club P-1 Racing Lug Nuts
Benen 3 point front strut bar
Lower Control Arms (not sure on brand)
Brakes
Rear Disc conversion
40/40 prop valve
Brembo blanks
Hawk HPS pads
Stronger brake booster (still figuring this one out)
That is what I consider stage one, the car will make a bit more power (120 if I am lucky) but look and drive A LOT better. This I predict will take me anywhere front 1-3 years to complete. If I still have the car after that point then I will do stage 2. Stage 2 is not AS planned out as it is a while off.
Stage 2
Engine swap
B18C1 with 5 speed LSD transmission
11-12:1 Compression pistons
Forged rods
Bisimoto stage 2 cam shaft
Bisimoto Valves and valve springs
Adjustable cam Gear
Stronger drive shafts
BBK Single stage Intake Manifold
BBK 70mm throttle body
Custom PRM intake
OR
D16Z6 With 5 Speed transmission (possible aftermarket LSD)
10.5-11.5:1 Compression Ratio Pistons
Forged rods
Bisimoto stage 2 cam shaft
Bisimoto Valves and valve springs
Adjustable cam Gear
Stronger drive shafts
That�s it for now, stay tuned for semi regular process updates. And Please give me comments and feedback, they are appreciated.
The Car
I bought my 1997 Honda Civic EX 4 door in December 2007 when my Topaz�s transmission decided it only liked to run my car in first gear. I bought it with 227xx kilometers on its d16y7 engine. Remember I am in Canada so my ex is equivalent to a US spec LX.
Front view
Left Side
Rear
Right Side
Angled/Action Shot =P
The paint is pretty bad and I had to replace the clutch after a month, granted it still had the stock clutch so really nothing to surprising there. Otherwise car runs great and when I took it on a 20 hour road trip I had no problems with it.
Last November (2008), I had the rear quarter panels/fenders redone due to rusting. They now look amazing.
The Plan
Being the way I am, I cannot leave well enough alone. I swore I would not modify this car but�.yeah that is not going to happen.
The overarching goals of this project Are to have a car that is practicle and yet still fun to drive and reliable.
Stage 1
Engine & Transmission
PRM Racing Intake
Megan 4-2-1 SS header (Installed June 3, 2009)
Magnaflow High flow Catalytic converter (Installed June 3, 2009)
Greddy Spectrum Elite Cat-back exhaust (Installed June 3, 2009)
Short Throw shift (not sure on brand)
Exterior
New OEM front and rear bumpers
Front and rear Lips (not sure on style)
Projector headlights (Installed July 22, 2009)
Stripped, any rust and dents fixed and repainted black
Tinting redone
Clear OEM style fog lights
Seibon OEM Style Carbon Fiber hood
Interior
Bride Gias seats
Kenwood Excelon KDA-X692 head unit (Installed March 2009)
Infinity Kappa 62.9I 6.5s front
Infinity Kappa 692.9I 6x9s rear
Suspension
KYB AGX Struts
Spoon progressive Springs
Buddy Club P-1 Racing SF Gunmetal Wheels (not sure on 15s or 16s)
Buddy Club P-1 Racing Lug Nuts
Benen 3 point front strut bar
Lower Control Arms (not sure on brand)
Brakes
Rear Disc conversion
40/40 prop valve
Brembo blanks
Hawk HPS pads
Stronger brake booster (still figuring this one out)
That is what I consider stage one, the car will make a bit more power (120 if I am lucky) but look and drive A LOT better. This I predict will take me anywhere front 1-3 years to complete. If I still have the car after that point then I will do stage 2. Stage 2 is not AS planned out as it is a while off.
Stage 2
Engine swap
B18C1 with 5 speed LSD transmission
11-12:1 Compression pistons
Forged rods
Bisimoto stage 2 cam shaft
Bisimoto Valves and valve springs
Adjustable cam Gear
Stronger drive shafts
BBK Single stage Intake Manifold
BBK 70mm throttle body
Custom PRM intake
OR
D16Z6 With 5 Speed transmission (possible aftermarket LSD)
10.5-11.5:1 Compression Ratio Pistons
Forged rods
Bisimoto stage 2 cam shaft
Bisimoto Valves and valve springs
Adjustable cam Gear
Stronger drive shafts
That�s it for now, stay tuned for semi regular process updates. And Please give me comments and feedback, they are appreciated.
Last edited by Tiran; Oct 18, 2009 at 02:34 PM. Reason: Added Pics

The furious four doors are taking over! looks like you have a plan. But, if you are gonna do all that engine/tranny work, why not skip directly to stage 2 on that? Otherwise you just waste money.
And if you go for a bigger master cylinder, I'd think you wouldn't need to change the brake booster. I just did rear discs with 4040 prop and trailing arms only. Mine work fine with stock MC and booster. With Brembros and Hawks, you'd be about where you wanna be.
And if you go for a bigger master cylinder, I'd think you wouldn't need to change the brake booster. I just did rear discs with 4040 prop and trailing arms only. Mine work fine with stock MC and booster. With Brembros and Hawks, you'd be about where you wanna be.

March 2010 ROTM
Joined: Sep 2007
Posts: 1,962
From: Louisville, KY
Good to see someone else building a 4 door. Im glad to see people finally showing interest in them. I used to have an LX. A coupe isnt practicle for me, so I have to have a hatch or 4 door. Your plans sound good...and expensive! I agree with Itinerant, why waste money on the motor you have if you plan on swapping?
Thread Starter
|
HCF Member
Joined: Sep 2008
Posts: 263
From: CANADA!!!
well when I do teh swap, the Cat and ctaback will stay the same, I will just need a new header.
Stock Y7 intake annoying, it makes me sick to look at it.
And a short throw is really not THAT expensive and i think it will greatly improve my enjoyment till I can get to stage 2.
As for the brake thing, I only made the comment about the booster because of itinerant's comment earlier after his swap, he was saying he had to press the pedal harder to get braking like he did before.
But I figure I will do the swap with the arms and 40/40 and see how it feels. If I want something more aggressive I will look into a new booster.
Ideally I woudl like to just rip the whole brake system out of a 99 or 2000 Si/SiR. But I don't see that happening.
Anyway, exhaust swap happening tomorrow, hopefully lots of pics and video.


HCF Member
Joined: Jul 2008
Posts: 3,428
From: Pueblo, CO
y7 intake manifold is an embarrassment lol wtf were they thinking with that think
Thread Starter
|
HCF Member
Joined: Sep 2008
Posts: 263
From: CANADA!!!
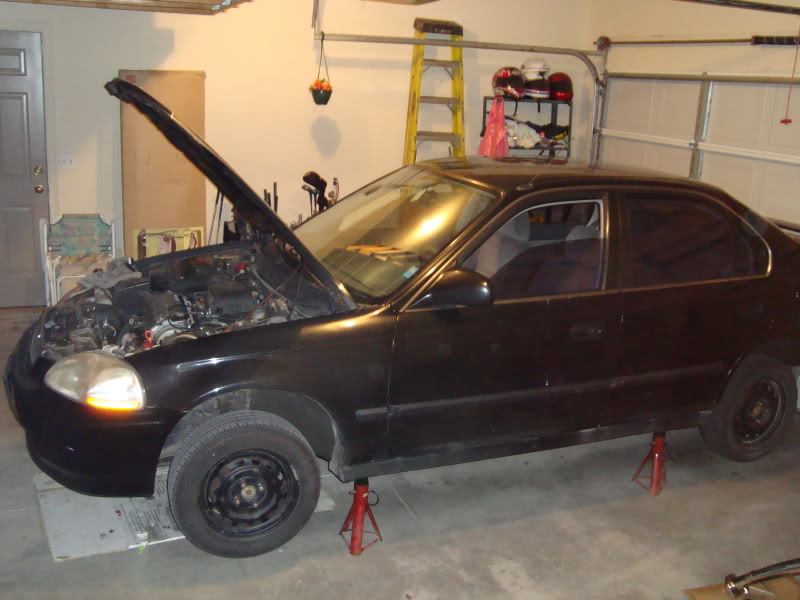
Got the exhaust installed today. My car now Have D16Y8 style exhaust and is a lot quieter then...broken.
Overall it took me about 5 hours to do it, but I was taking my time and this is the first MAJOR project I have done to a car, so I was a bit OCDish/paranoid.
The night before I jacked it up in the garage, took off the heat shield and soaked the header screws in penetrating fluid. I went to bed, got up at 1130 before my shift at midnight and coated them again. When I got home from work at 830 I coated them again before I started at about 930-10ish.
I was paranoid of stripping the header nuts but due to the amount of fluid I used and how much time I gave it to sit and work, all nine came out perfectly and I just reused them.
Also the night before I coated my header's midway gasket in copper RTV and torqued it to 25ft-lbs per screw and let it sit over night (14 hours) to ensure a good seal.
Time spent was about 3 hours on removal of the old system, 1.5 hours install of new one )this includes running into town to get some hardware I need) and then 30 minutes waiting for it to cool down so I could recheck and re-torque the nuts and bolts.
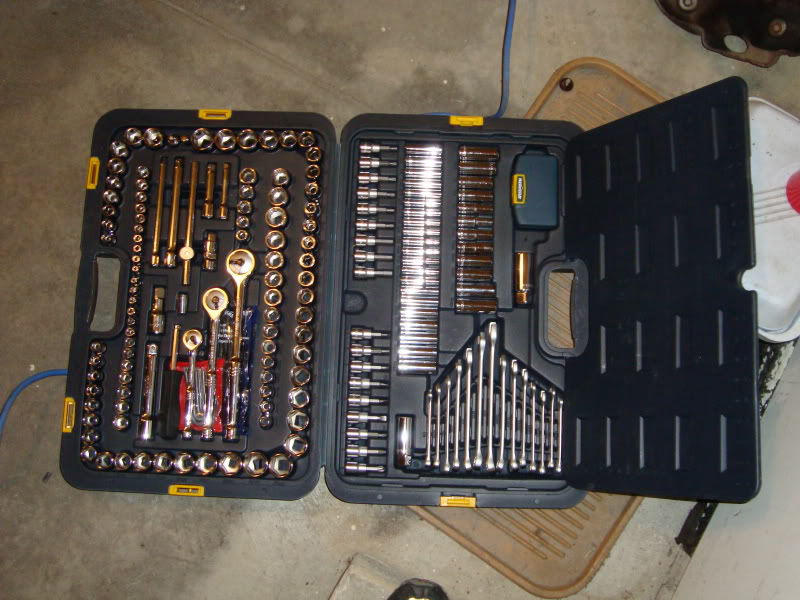
Tools I used were a 241 piece socket set, WD-40, penetrating fluid, brake cleaner, wrenches, a jack and jack stands.
Also I bought some Mechanix Gloves, the impact with the gel around the knuckles and padded grips. THESE THINGS ARE AMAZING! saved my knuckles so many times.
Ok, here are some pics, I promised a lot but...yeah I was busy fixing it. NO video yet, will come in the next few days.
The tools
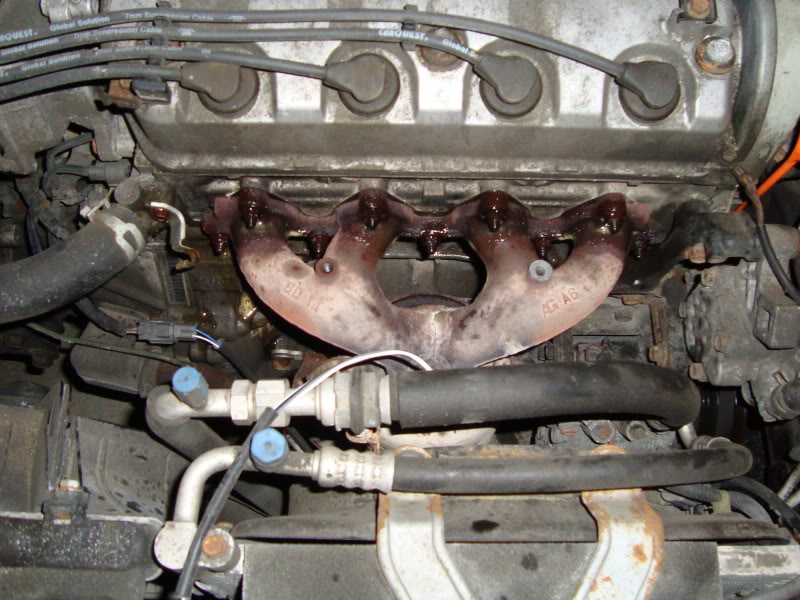
The patient is ready.
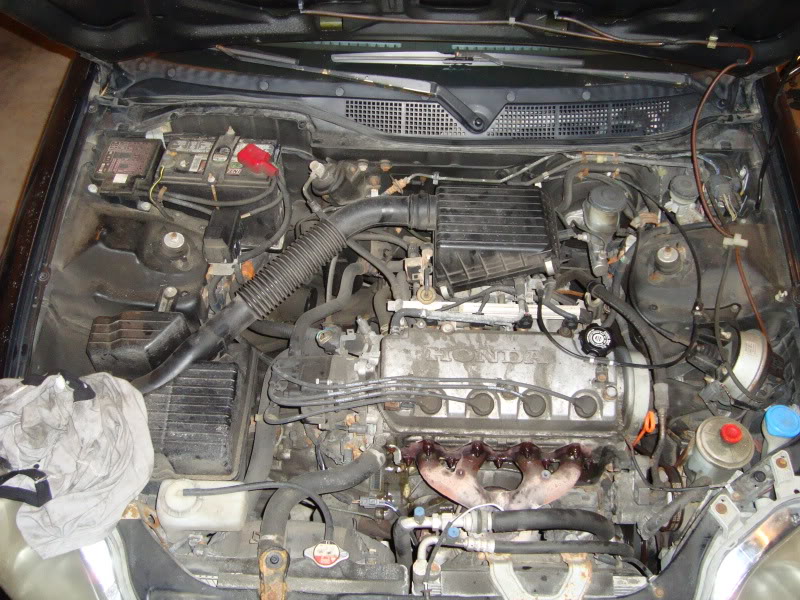
Bone Stock but not for long
Parts prepped prior to install
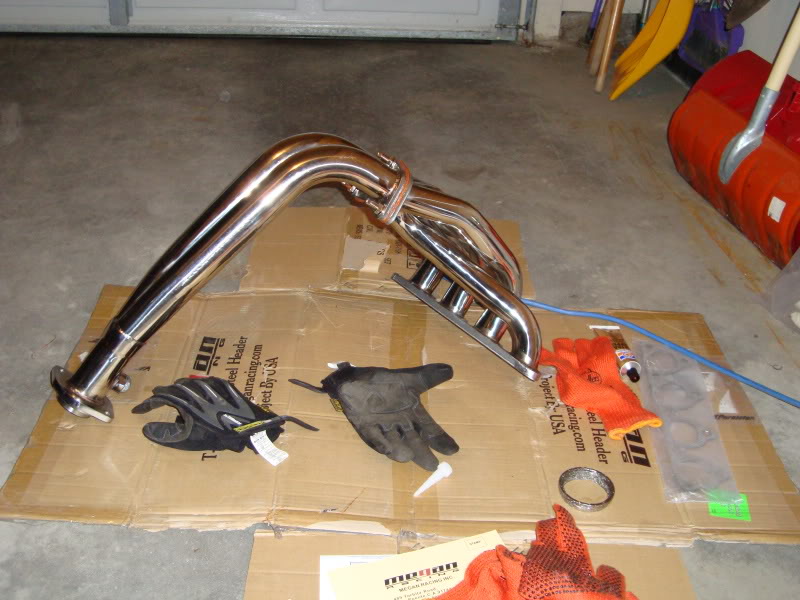
Parts covered penetrating fluid.
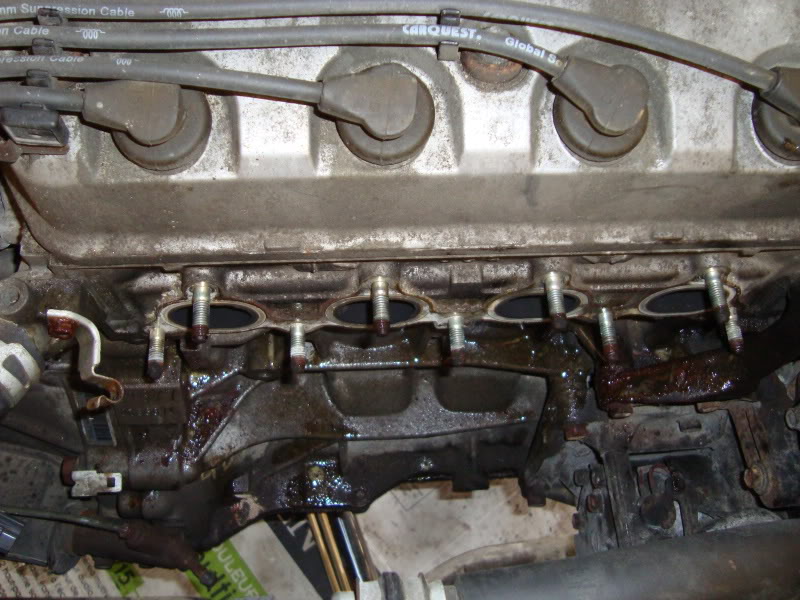
Manifold-ectomy complete
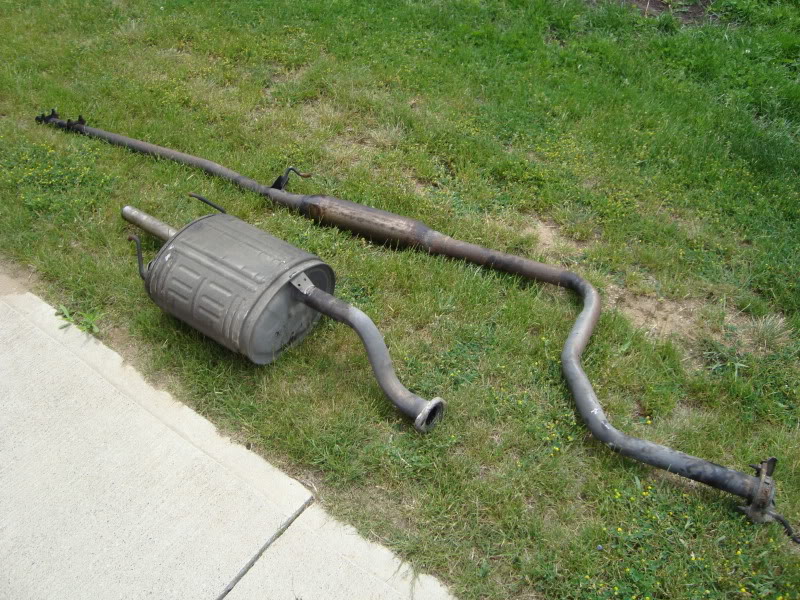
Old Exhaust system Removed
Swapping out O2 sensors
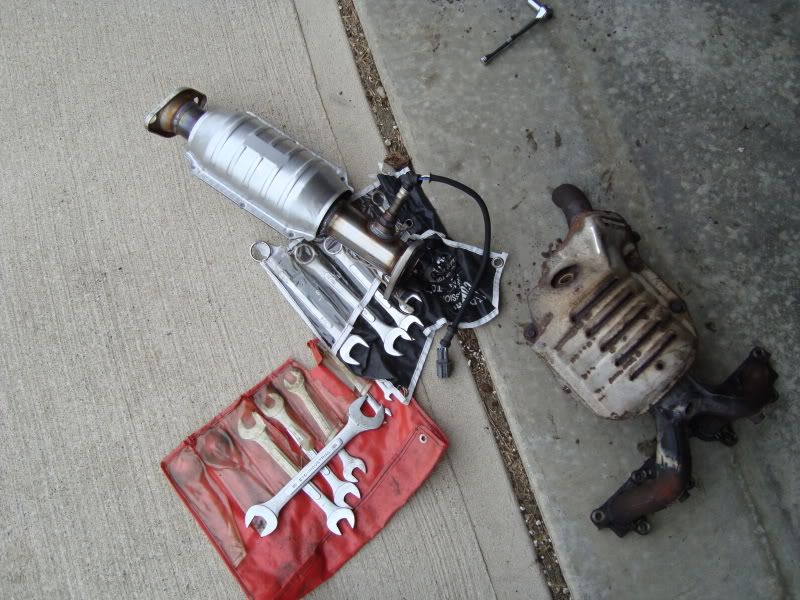
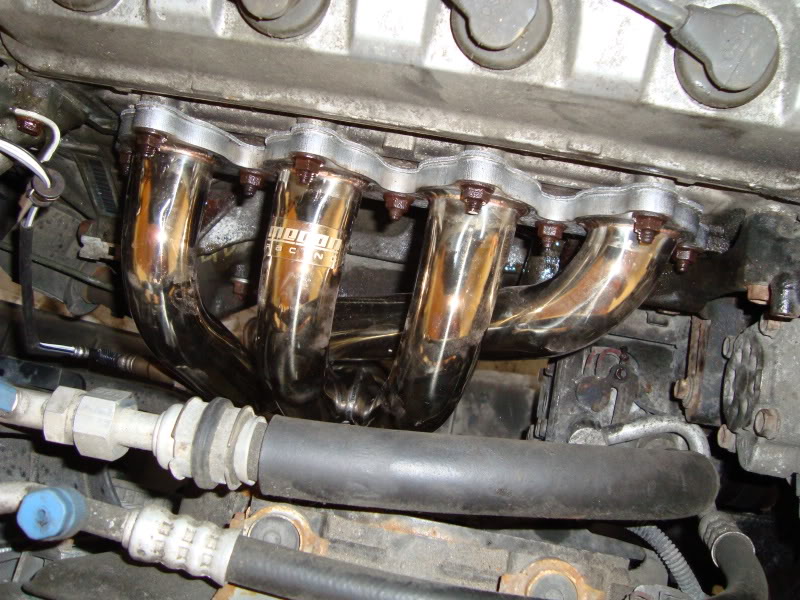
Header Installed
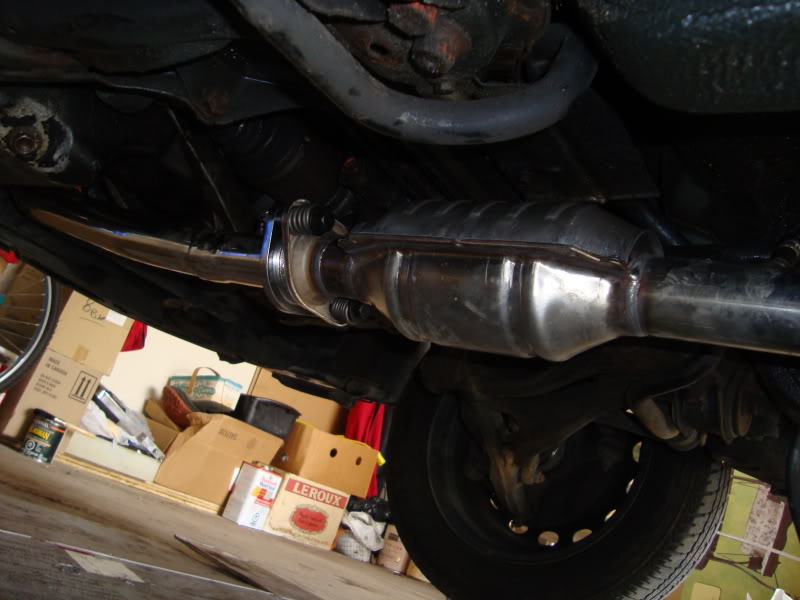
Catalytic converter installed
Midpipe Installed
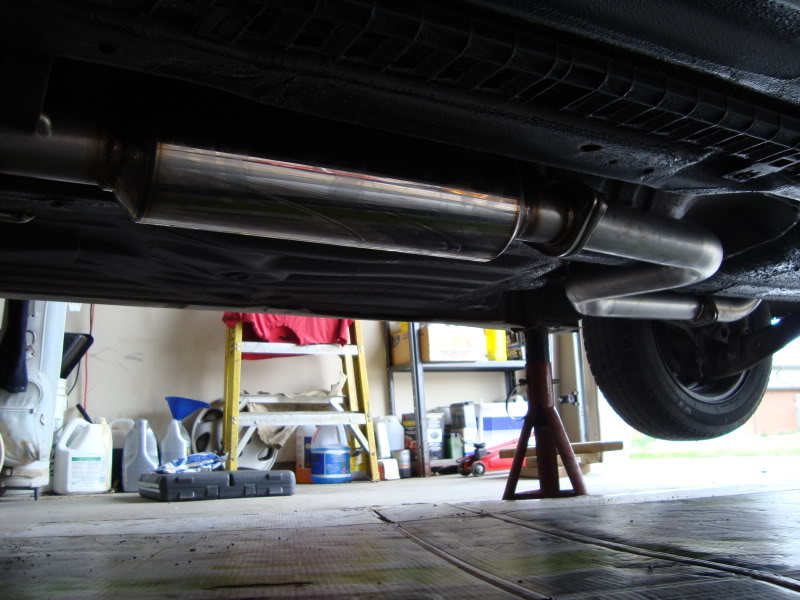
Muffler Installed
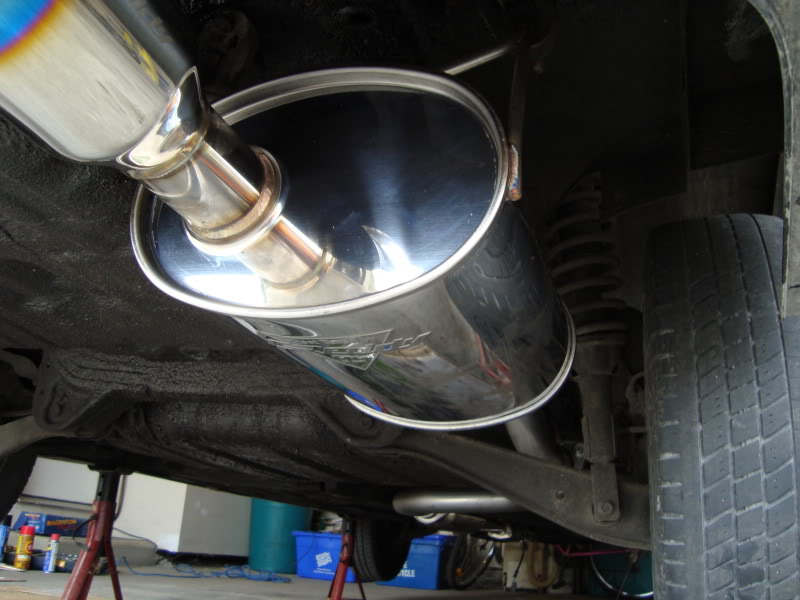
New view from the rear
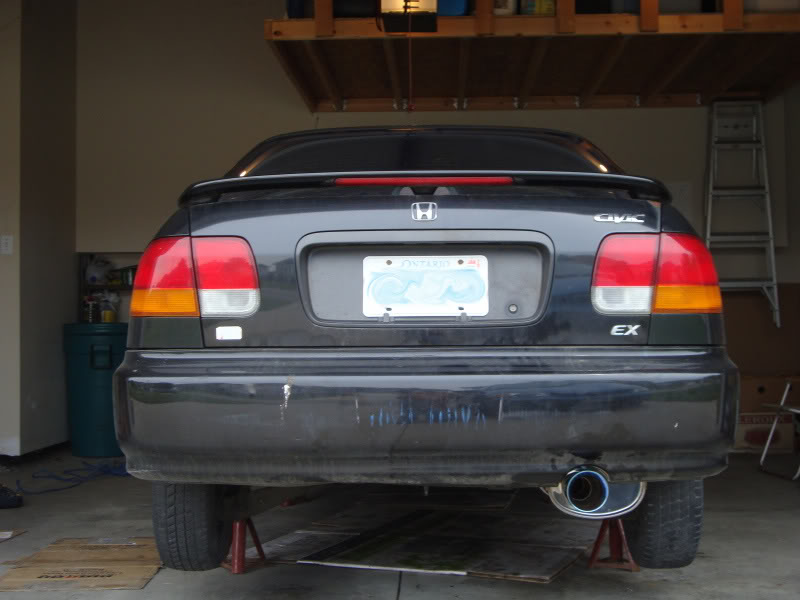
All in all I am very pleased.
Also I found out that my Stock manifold had 2 cracks. one was massive and went almost all the way around it. So it is a good thing i did this.
Thats all for now.
Overall it took me about 5 hours to do it, but I was taking my time and this is the first MAJOR project I have done to a car, so I was a bit OCDish/paranoid.
The night before I jacked it up in the garage, took off the heat shield and soaked the header screws in penetrating fluid. I went to bed, got up at 1130 before my shift at midnight and coated them again. When I got home from work at 830 I coated them again before I started at about 930-10ish.
I was paranoid of stripping the header nuts but due to the amount of fluid I used and how much time I gave it to sit and work, all nine came out perfectly and I just reused them.
Also the night before I coated my header's midway gasket in copper RTV and torqued it to 25ft-lbs per screw and let it sit over night (14 hours) to ensure a good seal.
Time spent was about 3 hours on removal of the old system, 1.5 hours install of new one )this includes running into town to get some hardware I need) and then 30 minutes waiting for it to cool down so I could recheck and re-torque the nuts and bolts.
Tools I used were a 241 piece socket set, WD-40, penetrating fluid, brake cleaner, wrenches, a jack and jack stands.
Also I bought some Mechanix Gloves, the impact with the gel around the knuckles and padded grips. THESE THINGS ARE AMAZING! saved my knuckles so many times.
Ok, here are some pics, I promised a lot but...yeah I was busy fixing it. NO video yet, will come in the next few days.
The tools
The patient is ready.
Bone Stock but not for long
Parts prepped prior to install
Parts covered penetrating fluid.
Manifold-ectomy complete
Old Exhaust system Removed
Swapping out O2 sensors
Header Installed
Catalytic converter installed
Midpipe Installed
Muffler Installed
New view from the rear
All in all I am very pleased.
Also I found out that my Stock manifold had 2 cracks. one was massive and went almost all the way around it. So it is a good thing i did this.
Thats all for now.


March 2010 ROTM
Joined: Sep 2007
Posts: 1,962
From: Louisville, KY
Looks like a clean install. I just got a Megan header in the mail yesterday and will be installing it this weekend. My car came with an ebay knockoff header, it now has 3 good size cracks in it and its only 6 months old.