
Low fuel economy?

Recognized HCF Member
Joined: Sep 2007
Posts: 9,453
From: Houston, Texas
I definitely drive lightly. I got an average of 48mpg driving the 400 mile round trip from Crater Lake and back in my 97 Sentra.

Is fuel filter worth looking at? What about those add-to-gasoline fuel injector cleaners?
Definitely -- (regarding the fuel treatment). Check out the Seafoam treatment in the DIY section. By the way, I noticed recently that my local Walmart now sells cans of Seafoam.

Thread Starter
|
HCF Member
Joined: Jan 2009
Posts: 259
What's your guys' thoughts on cold air intakes? I figured they would add power and consume more fuel but sources on the net say they can save fuel? Is this true?
Also, in the DIY section, it mentions removing the bumper on a '97 to perform the add-on? You really need to pull the entire bumper?
Also, in the DIY section, it mentions removing the bumper on a '97 to perform the add-on? You really need to pull the entire bumper?

HCF Member
Joined: Mar 2008
Posts: 379
From: Lake Wylie, SC, USA
Keep in mind that the air pressure in the tires SERIOUSLY affects gas mileage.
I recommend 32PSI cold pressure for all four tires, in addition to the new fuel filter, spark plugs (NGK ZFR6F-11) , cap, rotor and wire set that were previously mentioned.
Here are the Honda part#s
98079-5614G SPARK PLUG (ZFR6F-11) (NGK) $2.52
32722-P2A-003 WIRE, IGNITION (SUMITOMO) $62.98 wire set
30102-P54-006 CAP ASSY. $18.81 distributor cap
30103-P08-003 HEAD ASSY., ROTOR $17.17 rotor
16010-ST5-933 FILTER SET, FUEL (TOYO ROKI) $21.06
I also recommend a valve adjustment if you can hear the valves rattle when the motor is cold.
You will need a valve cover gasket set
12030-P2A-000 GASKET SET, HEAD COVER $28.34
After doing all of this you should have NO PROBLEM breaking the 30MPG barrier.
I recommend that you buy the parts here - SanLeandro Honda is in the SanFrancisco bay area and they sell ALL HONDA OEM parts for 20%off list price (no sales tax too if you're outside of CA). You also might get your local Honda dealer to price match SanLeandro's prices on the parts (if you are very nice with the parts guy).
http://www.slhondaparts.com/browse.a...ansLevel=4ATKA
The part#s I gave are for a '99 Civic LX w/AT and a D16Y7 engine
Last edited by TheJGB3; Jan 13, 2009 at 07:28 PM.
Thread Starter
|
HCF Member
Joined: Jan 2009
Posts: 259
I'm going to try to do the timing on my car tomorrow. I was reading this DIY, https://www.hondacivicforum.com/foru...ad.php?t=16210 , and noticed the reference to the "crank". Ie, connect the timing gun clip to the spark plug wire nearest the crank. What is the crank? LOL. Sorry, I'm a retard!
(By the way, theJGB3, thank you for the parts list. I was definitely purchase all the items you mentioned. While I'd love to do my tuneup this weekend, I'm guessing OEM is better than some other brand from Autozone for a lot of that stuff, right?)
(By the way, theJGB3, thank you for the parts list. I was definitely purchase all the items you mentioned. While I'd love to do my tuneup this weekend, I'm guessing OEM is better than some other brand from Autozone for a lot of that stuff, right?)
Last edited by simons81; Jan 16, 2009 at 11:26 PM.
Recognized HCF Member
Joined: Sep 2007
Posts: 9,453
From: Houston, Texas
Yeah, good idea to go with JGB's OEM parts.
Crank refers to the crankshaft pulley. The timing light is connected to the spark plug wire for cylinder #1, which is furthest from the distributor and closest to the crankshaft pulley (pictured with timing marks and pointer in the DIY you mentioned).
Crank refers to the crankshaft pulley. The timing light is connected to the spark plug wire for cylinder #1, which is furthest from the distributor and closest to the crankshaft pulley (pictured with timing marks and pointer in the DIY you mentioned).
Thread Starter
|
HCF Member
Joined: Jan 2009
Posts: 259
Ok, last question and I think I'm good for a while with my lame questions. About the Seafoam treatment mentioned above.
https://www.hondacivicforum.com/foru...ad.php?t=14612
It mentions pouring 1/3 into the gas tank, and another 1/3 into the crank case, and letting it suck up the final 1/3 into the vacuum advance tube. For the crank case, that means just taking off the oil cap and pouring it straight in, yes? And for the vacuum line, where might I find this? It says it's connected to the fuel pressure regulator. I'm not sure where this is located.
Thank you guys for all the help by the way. I essentially have a laundry list of several maintenance tasks I'm going to do. You guys have saved this broke *** college student some good moola. Thank you thank you
Recognized HCF Member
Joined: Sep 2007
Posts: 9,453
From: Houston, Texas
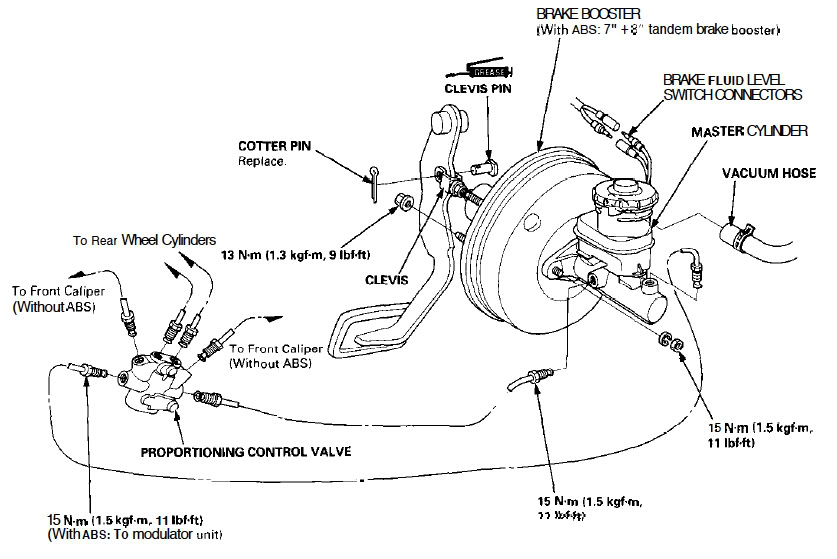
I find the vacuum line attached to the brake booster to be more convenient.
Thread Starter
|
HCF Member
Joined: Jan 2009
Posts: 259
That picture helps a ton. So I should remove the vacuum hose from the master cylinder and slowly pour a third of the bottle in the hose? Err, I guess, as the DIY says, submerge part of the hose into the bottle, which will then suck the fluid into the hose, but do so without completely flooding the hose right?