
Reaper's Mustang Project (abridged version)


Thread Starter
|
Super Cereal Admin
Joined: Feb 2007
Posts: 7,081
From: Lexington, KY
thanks... I'm definitely happy with how things are going with the car (except for the little... umm... complications that seem to arise every time I do something lol). And yeah, I love the color... I'm not sure which I like more; performance red or competition orange. But I've seen maybe three other performance red mustangs since I got mine. And I think they did away with it after the 04 model year. At least I don't think the s197's came in performance red anyway. But more often than not I see the torch red (that crimson color) or whatever New Edges.

Thread Starter
|
Super Cereal Admin
Joined: Feb 2007
Posts: 7,081
From: Lexington, KY
yeah, the competition orange is a bada** color. It's definitely one of my favorite stock paint colors ever.
But anyway, I finally got off my lazy **** to work on the diffuser a bit... I have the skeleton mostly done (there's still going to be a large section that covers the rear of the gas tank, but that's later). Right now I'm waiting for the wood glue to dry so I can start the fiberglassing.
Pics:
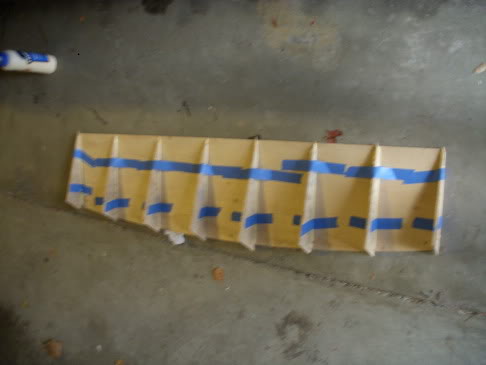
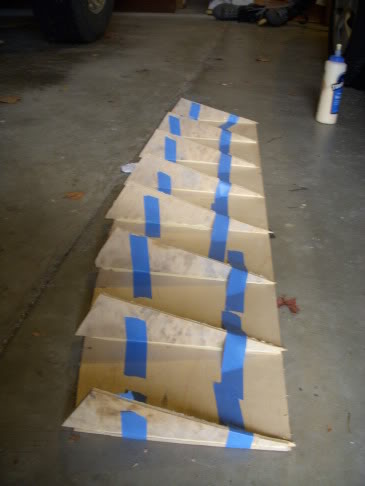
But anyway, I finally got off my lazy **** to work on the diffuser a bit... I have the skeleton mostly done (there's still going to be a large section that covers the rear of the gas tank, but that's later). Right now I'm waiting for the wood glue to dry so I can start the fiberglassing.
Pics:

 i really want to learn so that I can make a custom center console in the ef for gauges and ****.
Thread Starter
|
Super Cereal Admin
Joined: Feb 2007
Posts: 7,081
From: Lexington, KY
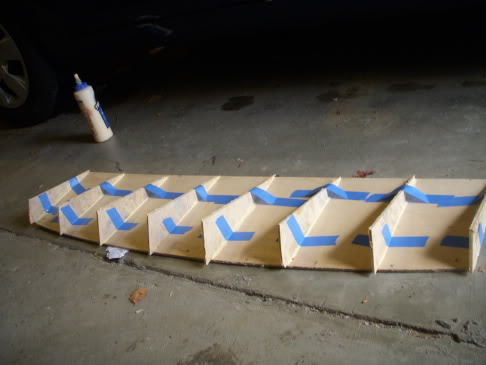
Yeah, I took forever to glue everything and tape it, just because I wanted to make sure everything was perfectly straight and square.
But yeah, john, it's all about hands-on experience. The hardest part about fiberglassing is getting the right ratio of hardener to resin. If you want, I can write up a little how-to tomorrow when I start fiberglassing it.
But yeah, john, it's all about hands-on experience. The hardest part about fiberglassing is getting the right ratio of hardener to resin. If you want, I can write up a little how-to tomorrow when I start fiberglassing it.
Thread Starter
|
Super Cereal Admin
Joined: Feb 2007
Posts: 7,081
From: Lexington, KY
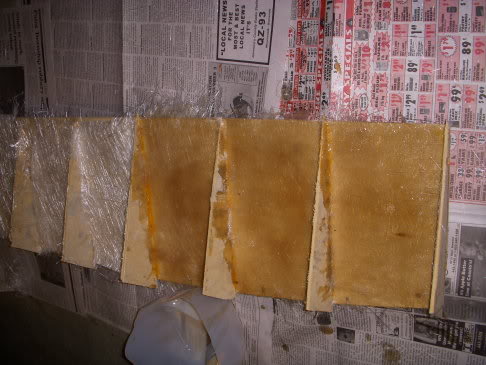
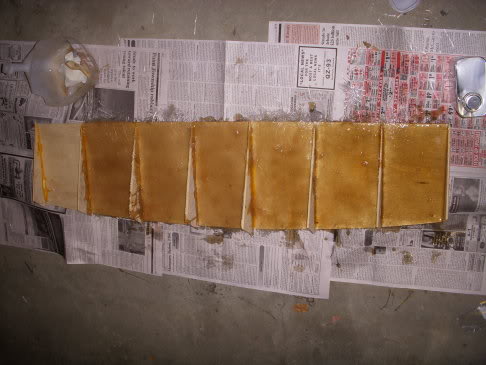
Okay, I got some of the fiberglassing done. Unfortunately, I didn't have enough supplies (resin and fiberglass mat), so I didn't get it completely fiberglassed, but I got a good bit of it done. I still have to fiberglass the fins, but I have most of the diffuser itself done.
Anyway, here's the write-up I promised.
First off, you'll need a few things:
1) fiberglass resin & hardener (the hardener will come with the resin)
2) fiberglass mat
3) latex gloves or (the name escapes me at the moment; they're the thicker disposable gloves)
4) a paint brush; get something cheap, you won't be able to re-use it. I found the $.97 2" brushes at wal-mart are perfect
5) a container to mix the resin in
6) flexible sanding block
7) sandpaper (I usually start at 120 grit and work my way up), 3M wetordry preferably
8) technically, you should have a dust mask
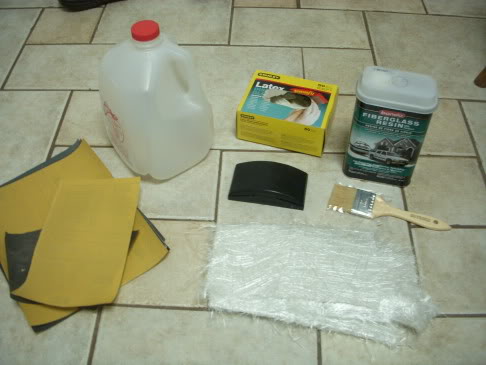
Now, for my mixing container, I used a gallon jug, and cut it like so:
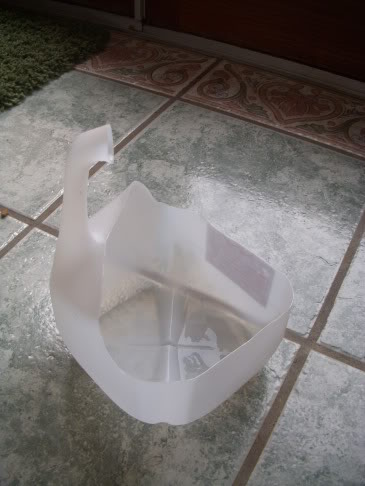
Step 1
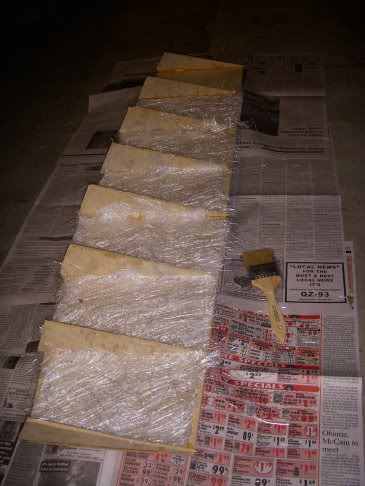
Okay, now before you start anything, get your fiberglass mat. Take a pair of scissors, and cut all the pieces out to fit what you're fiberglassing. You want everything to be cut out before you start fiberglassing; trust me on this. Also, if what you're fiberglassing needs to have a decent amount of strength, plan on using at least two layers of mat.
Step 2
Okay, now it's time to mix the resin. Make sure you put a pair of gloves on before handling the resin. This s**t is wicked and will stick to anything, and it takes about two weeks to get it off your skin. Also, if you have a dust mask, it's time to put it on. Pour some of the resin in your mixing container. Now, take the included liquid hardener and squirt some in. I believe the ratio is 100:1, but it's really all feel. Also, if it's warmer out, you'll need less hardener, and if it's colder, you'll need more. Take your paintbrush and mix the hardener/resin up nice and good.
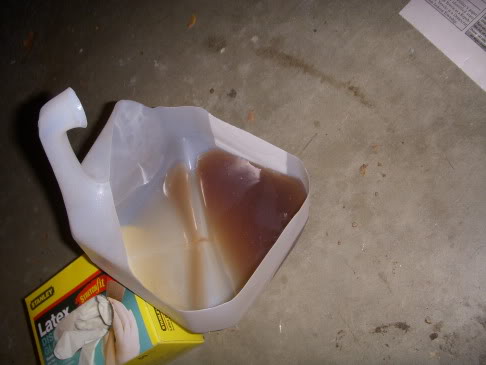
I feel i should note that it's better not to mix all the resin you'll need right away. It really sucks when your resin starts setting up while you're halfway through laying the fiberglass. I'm speaking from experience on this.
Step 3
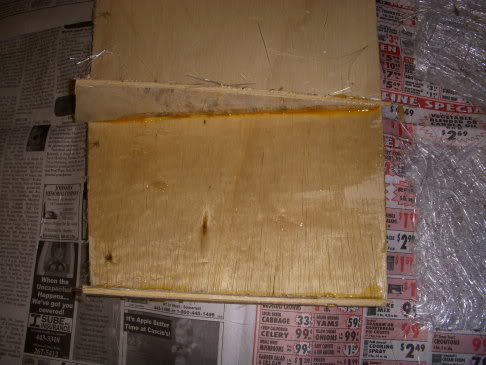
So now it's time to actually fiberglass. Remove the fiberglass mat if it's laying in place. Take your paintbrush and "paint" some of the resin over whatever you're going to be fiberglassing; this will help the mat adhere properly, not to mention it holds it in place if you're going to be fiberglassing on a vertical surface.
step 4
Now you're ready to lay the fiberglass mat. After spreading some resin, lay the fiberglass mat in place. Take the paintbrush, and spread more resin on the mat. Until the mat gets fairly soaked with resin, it's going to be a PITA to spread the resin without pulling apart the fiberglass. I find it's easiest to sort of dab the resin on with the paintbrush, then once the mat is soaked, you can use side to side strokes. Also, avoid air bubbles, just like you would with body filler.
Keep repeating steps 3 & 4 over the full surface of what you're fiberglassing.
Step 5
After the fiberglass is set up (it shouldn't be tacky whatsoever), it's time to start sanding. You definitely want to wet-sand; dry-sanding will make a rediculous amount of dust, not to mention it'll clog up sandpaper faster than you can say "this sandpaper blows". If you don't know how to wet-sand, it's exactly what it sounds like. It's easiest to have a bucket of warm water nearby. All you do is keep the sandpaper soaked with water. It helps you sand smoother, and it keeps down the dust.*
That's more or less it. If you want, you can use body filler to give you a smooth finish, or you can spend 6 or 7 hours sanding the fiberglass to a perfect finish. For my rear diffuser, I'd rather not use body filler, so I'm going to go with the second option.
*Fun fact #372: fiberglass dust is extremely flammable. Believe me; throw a handful of fiberglass dust into a fire and you'll have one helluva fireball
Anyway, here's the write-up I promised.
First off, you'll need a few things:
1) fiberglass resin & hardener (the hardener will come with the resin)
2) fiberglass mat
3) latex gloves or (the name escapes me at the moment; they're the thicker disposable gloves)
4) a paint brush; get something cheap, you won't be able to re-use it. I found the $.97 2" brushes at wal-mart are perfect
5) a container to mix the resin in
6) flexible sanding block
7) sandpaper (I usually start at 120 grit and work my way up), 3M wetordry preferably
8) technically, you should have a dust mask
Now, for my mixing container, I used a gallon jug, and cut it like so:
Step 1
Okay, now before you start anything, get your fiberglass mat. Take a pair of scissors, and cut all the pieces out to fit what you're fiberglassing. You want everything to be cut out before you start fiberglassing; trust me on this. Also, if what you're fiberglassing needs to have a decent amount of strength, plan on using at least two layers of mat.
Step 2
Okay, now it's time to mix the resin. Make sure you put a pair of gloves on before handling the resin. This s**t is wicked and will stick to anything, and it takes about two weeks to get it off your skin. Also, if you have a dust mask, it's time to put it on. Pour some of the resin in your mixing container. Now, take the included liquid hardener and squirt some in. I believe the ratio is 100:1, but it's really all feel. Also, if it's warmer out, you'll need less hardener, and if it's colder, you'll need more. Take your paintbrush and mix the hardener/resin up nice and good.
I feel i should note that it's better not to mix all the resin you'll need right away. It really sucks when your resin starts setting up while you're halfway through laying the fiberglass. I'm speaking from experience on this.
Step 3
So now it's time to actually fiberglass. Remove the fiberglass mat if it's laying in place. Take your paintbrush and "paint" some of the resin over whatever you're going to be fiberglassing; this will help the mat adhere properly, not to mention it holds it in place if you're going to be fiberglassing on a vertical surface.
step 4
Now you're ready to lay the fiberglass mat. After spreading some resin, lay the fiberglass mat in place. Take the paintbrush, and spread more resin on the mat. Until the mat gets fairly soaked with resin, it's going to be a PITA to spread the resin without pulling apart the fiberglass. I find it's easiest to sort of dab the resin on with the paintbrush, then once the mat is soaked, you can use side to side strokes. Also, avoid air bubbles, just like you would with body filler.
Keep repeating steps 3 & 4 over the full surface of what you're fiberglassing.
Step 5
After the fiberglass is set up (it shouldn't be tacky whatsoever), it's time to start sanding. You definitely want to wet-sand; dry-sanding will make a rediculous amount of dust, not to mention it'll clog up sandpaper faster than you can say "this sandpaper blows". If you don't know how to wet-sand, it's exactly what it sounds like. It's easiest to have a bucket of warm water nearby. All you do is keep the sandpaper soaked with water. It helps you sand smoother, and it keeps down the dust.*
That's more or less it. If you want, you can use body filler to give you a smooth finish, or you can spend 6 or 7 hours sanding the fiberglass to a perfect finish. For my rear diffuser, I'd rather not use body filler, so I'm going to go with the second option.
*Fun fact #372: fiberglass dust is extremely flammable. Believe me; throw a handful of fiberglass dust into a fire and you'll have one helluva fireball
Last edited by reaper2022; Nov 16, 2008 at 08:48 AM.