
LCA Bushing Replacement


Thread Starter
|
Super Cereal Admin
Joined: Feb 2007
Posts: 7,081
From: Lexington, KY
Well, since I had some major problems installing my bushings, I figured maybe somebody else might run into the same problems, so this might come in handy.
Note: this DIY is written for people who do not have access to a hydraulic press. Using a hydraulic press would make getting the bushings out a lot easier, but alas... some of us live in small towns and the nearest hydro press is who-knows-where.
Items needed:
well, these are kind of important
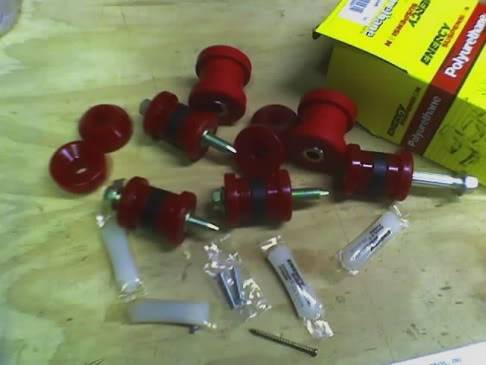
as are these (well, you don't need new bolts, but I figured I might as well get some)
hammer, hacksaw (or reciprocating saw [aka sawzall], not pictured), and 21/26mm sockets
(not pictured): drill -or- torch
Items that will make things a lot easier:
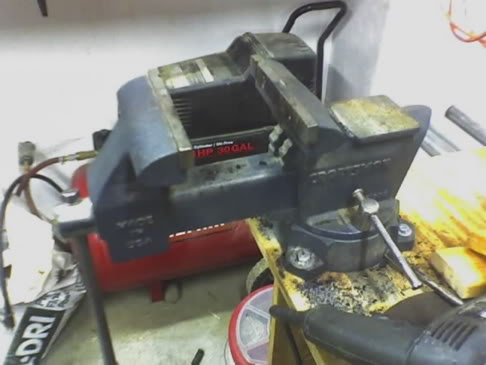
a vice. Trust me on this, it'll save you a ton of time.
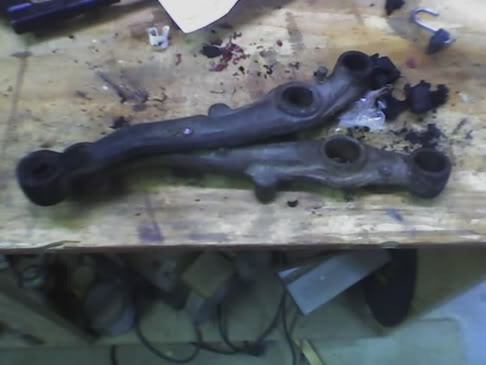
1) Okay, well the first thing you want to do (once the LCA's are off the car and ready to be worked on) is clean out the holes for the bushings. You can do this one of three ways. The fastest way is to press them out with a hydraulic press. Since this DIY is written for those of us that do not have access to a press, the easiest way (short of method #1) to do this (what I did) was just go to town with a propane torch and burn away the stock rubber bushings. The second non-pressing method is to take a drill (with a drill bit, not a driver bit) and drill twenty or so holes in the rubber until you can cut the rest of the bushing out. Either way, clean out the rubber holes.
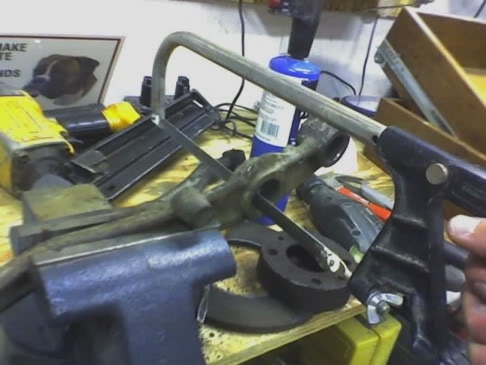
2) Now if you look closely, you'll see there's a thin metal sleeve inside each of the holes. This gets tricky (and you may have to do this step regardless of whether or not you pressed the bushings out). Look closely at the picture, and you'll see the ring I'm talking about:

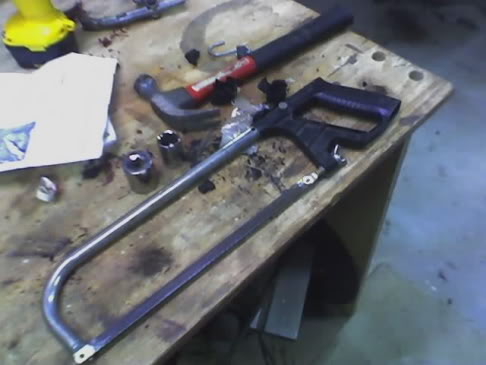
so this is what we do: unscrew the blade from the hacksaw and stick the blade through the hole in the LCA and screw the hacksaw back together so it looks like this:
3) Now, saw all the way through the metal sleeve (if you don't have a vice, you'll have to figure out a way to hold the lca and saw at the same time... I'd think just putting it on the ground and holding it would work, but I'm too lazy for that) All you need is one cut on the inside of each sleeve. It's okay if you cut into the LCA itself a little bit, but don't cut through the LCA completely (for obvious reasons). (note: if you do have access to a reciprocating saw, use it!!! it makes things go a lot smoother, and is a ton faster than using a hacksaw. The downside is that some metal blades are a little tall, so they have a hard time fitting in the hole if the rubber bushing isn't close to 100% gone)

see the grooves? That's all you need to do.
4) Now this is where the 21mm and 26mm sockets and hammer come into play. You might have cut a groove in the sleeve, but it's still going to be stuck there. So what do you do? This:
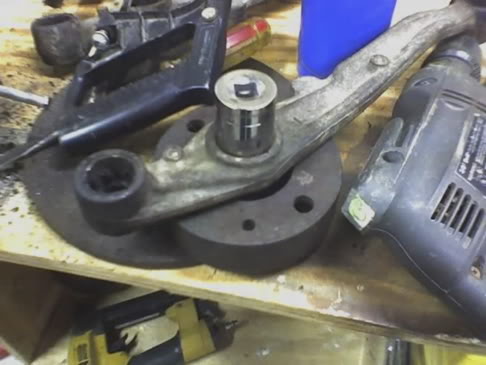
and just hammer away. The 21mm socket is good for the top/bottom LCA bushing, and the 26mm socket is good for the shock-mount bushing (provided you're even replacing it) (note: if you happen to have a broken brake rotor from a 1978 Fiat X-1/9 handy, it works well for this step lol)
5) Now it's time to put the new bushing in; make sure you use plenty of the provided grease, or else it'll squeak when you put your car back together. It's fairly straightforward: grease up the inside of the hole and slide the bushings in. The shock-mount bushings go in fairly easily, but I had some problems with the top and bottom bushings.
6) The first thing you're going to want to do (whether you have a vice or not) is to put one side of the bushing in, Once that side is in, you'll probably notice (with the top and bottom bushings) that the center sleeve will not go in without a fight. So here's what you do: once one side of the bushing is in (you should be able to press it in by hand), grease up the center sleeve and put it into the other side of the bushing. Now grease up the bushing/sleeve combo and put it in place (press it in as far as it goes). If you have a vice, just use it like so:
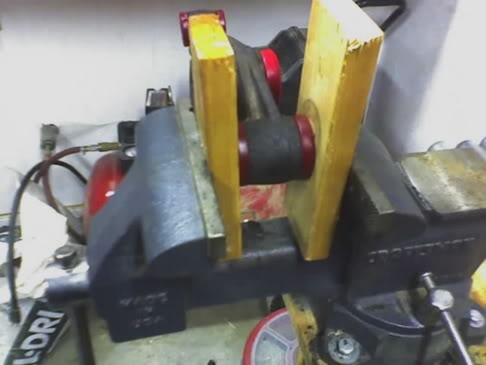
If you don't have a vice, you'll have to put the LCA on the ground and get out your handy-dandy 21mm & 26mm sockets and hammer and keep hammering the bushing and everything until it decides to go in place. (trust me, this method does work, though it takes some time... I used it at first until I remembered I had a vice bolted to the workbench )
)
7) Now repeat steps 1-6 for the rest of the bushings and get everything back on your car! And you should probably consider getting your alignment checked since you just took apart the rear suspension.
Hope this helps somebody.
Note: this DIY is written for people who do not have access to a hydraulic press. Using a hydraulic press would make getting the bushings out a lot easier, but alas... some of us live in small towns and the nearest hydro press is who-knows-where.
Items needed:
well, these are kind of important
as are these (well, you don't need new bolts, but I figured I might as well get some)
hammer, hacksaw (or reciprocating saw [aka sawzall], not pictured), and 21/26mm sockets
(not pictured): drill -or- torch
Items that will make things a lot easier:
a vice. Trust me on this, it'll save you a ton of time.
1) Okay, well the first thing you want to do (once the LCA's are off the car and ready to be worked on) is clean out the holes for the bushings. You can do this one of three ways. The fastest way is to press them out with a hydraulic press. Since this DIY is written for those of us that do not have access to a press, the easiest way (short of method #1) to do this (what I did) was just go to town with a propane torch and burn away the stock rubber bushings. The second non-pressing method is to take a drill (with a drill bit, not a driver bit) and drill twenty or so holes in the rubber until you can cut the rest of the bushing out. Either way, clean out the rubber holes.
2) Now if you look closely, you'll see there's a thin metal sleeve inside each of the holes. This gets tricky (and you may have to do this step regardless of whether or not you pressed the bushings out). Look closely at the picture, and you'll see the ring I'm talking about:
so this is what we do: unscrew the blade from the hacksaw and stick the blade through the hole in the LCA and screw the hacksaw back together so it looks like this:
3) Now, saw all the way through the metal sleeve (if you don't have a vice, you'll have to figure out a way to hold the lca and saw at the same time... I'd think just putting it on the ground and holding it would work, but I'm too lazy for that) All you need is one cut on the inside of each sleeve. It's okay if you cut into the LCA itself a little bit, but don't cut through the LCA completely (for obvious reasons). (note: if you do have access to a reciprocating saw, use it!!! it makes things go a lot smoother, and is a ton faster than using a hacksaw. The downside is that some metal blades are a little tall, so they have a hard time fitting in the hole if the rubber bushing isn't close to 100% gone)
see the grooves? That's all you need to do.
4) Now this is where the 21mm and 26mm sockets and hammer come into play. You might have cut a groove in the sleeve, but it's still going to be stuck there. So what do you do? This:
and just hammer away. The 21mm socket is good for the top/bottom LCA bushing, and the 26mm socket is good for the shock-mount bushing (provided you're even replacing it) (note: if you happen to have a broken brake rotor from a 1978 Fiat X-1/9 handy, it works well for this step lol)
5) Now it's time to put the new bushing in; make sure you use plenty of the provided grease, or else it'll squeak when you put your car back together. It's fairly straightforward: grease up the inside of the hole and slide the bushings in. The shock-mount bushings go in fairly easily, but I had some problems with the top and bottom bushings.
6) The first thing you're going to want to do (whether you have a vice or not) is to put one side of the bushing in, Once that side is in, you'll probably notice (with the top and bottom bushings) that the center sleeve will not go in without a fight. So here's what you do: once one side of the bushing is in (you should be able to press it in by hand), grease up the center sleeve and put it into the other side of the bushing. Now grease up the bushing/sleeve combo and put it in place (press it in as far as it goes). If you have a vice, just use it like so:
If you don't have a vice, you'll have to put the LCA on the ground and get out your handy-dandy 21mm & 26mm sockets and hammer and keep hammering the bushing and everything until it decides to go in place. (trust me, this method does work, though it takes some time... I used it at first until I remembered I had a vice bolted to the workbench
)7) Now repeat steps 1-6 for the rest of the bushings and get everything back on your car! And you should probably consider getting your alignment checked since you just took apart the rear suspension.
Hope this helps somebody.


June 2010 ROTM
Joined: Oct 2006
Posts: 3,284
From: Milwaukee, WI
Oh, FYI, a press won't work, you HAVE to cut the sleeves. You will bend/break your LCA if you use a press.
Edit:
Nice DIY btw ftw.
Also, if you have a Sawzall it makes the cutting a lot quicker AND cut two slots, 180 degrees aparts. That makes it easier too.
Edit:
Nice DIY btw ftw.
Also, if you have a Sawzall it makes the cutting a lot quicker AND cut two slots, 180 degrees aparts. That makes it easier too.

Moderator
Joined: Jul 2005
Posts: 5,802
ORIGINAL: danomatic93
Oh, FYI, a press won't work, you HAVE to cut the sleeves. You will bend/break your LCA if you use a press.
Edit:
Nice DIY btw ftw.
Also, if you have a Sawzall it makes the cutting a lot quicker AND cut two slots, 180 degrees aparts. That makes it easier too.
Oh, FYI, a press won't work, you HAVE to cut the sleeves. You will bend/break your LCA if you use a press.
Edit:
Nice DIY btw ftw.
Also, if you have a Sawzall it makes the cutting a lot quicker AND cut two slots, 180 degrees aparts. That makes it easier too.
Thread Starter
|
Super Cereal Admin
Joined: Feb 2007
Posts: 7,081
From: Lexington, KY
roto: you want to explain the wisegrips method a little more so I can edit it in? Oh, and I have a Fiat rotor because my dad and I are restoring his '78 Fiat X-1/9  .
.
danomatic: yeah, I completely forgot about the sawzall thing when I was typing up the DIY... anyway, it's edited in
.danomatic: yeah, I completely forgot about the sawzall thing when I was typing up the DIY... anyway, it's edited in
Moderator
Joined: Jul 2005
Posts: 5,802
bump for question
i just got an extra set of front LCA's so i can finally do this. was just wondering what kinda blades should i use when cutting the metal sleeve and how many u think i should get? i'll be using a sawzall.
thanks!
i just got an extra set of front LCA's so i can finally do this. was just wondering what kinda blades should i use when cutting the metal sleeve and how many u think i should get? i'll be using a sawzall.
thanks!
June 2010 ROTM
Joined: Oct 2006
Posts: 3,284
From: Milwaukee, WI
I used bi-metal, for wood and light metal. But I'm sure just metal blades last longer. I would say that you could get two LCAs done with 1 blade, but I would get 2, just in case.
Thread Starter
|
Super Cereal Admin
Joined: Feb 2007
Posts: 7,081
From: Lexington, KY
I used normal metal blades when I did it. bi-metal ones like dano used would get the job done (probably a little slower than dedicated metal blades) too. Just make sure you clean all the rubber out from the stock bushing... the ones that I had spotless were nice and easy, but the ones that still had a bit of rubber attached to the rings were a PITA to cut (not to mention with the rubber, the sawzall blade was a tight fit in the hole). Oh, and I used one blade through the whole thing. I'd say get one, two if you want to be on the safe side.

Thread
Thread Starter
Forum
Replies
Last Post
Blue_Rocket_WRX_STi
Suspension, Brakes, Tires & Wheels
4
Sep 17, 2009 03:17 PM
97blackhonda
Suspension, Brakes, Tires & Wheels
0
Jun 14, 2009 06:47 PM
snosurfa7
Suspension, Brakes, Tires & Wheels
13
May 18, 2007 02:08 PM