
Cvcrcr's project/fix-up thread (version 1.1)


^^ It'll basically just be a sheet of aluminum cut to size and using OEM bolt holes for mounting. I'll have pics of the construction when I get around to actually doing it.
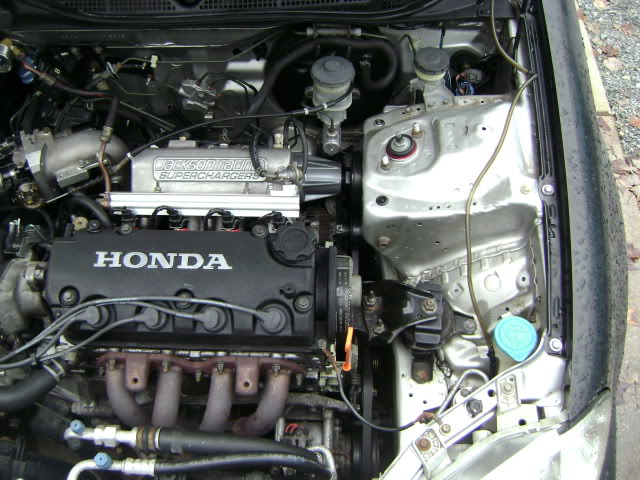
After 4 hours of work, the last big wire loom has been hidden away. I have it snaked through the fender well (at the top so it wouldn't be touched when I turn the wheel). Here's an updated pic:
Ordered my Cam gear key, Cruise control block off grommet, IAT Plug today! Might be ordering the dual gauge pod bezel and boost gauge today, too! Gotta check the funds after I go to Pepboys and get some supplies.
Last edited by cvcrcr99; Nov 1, 2009 at 12:33 PM.
Well, I pulled the whole front end off again today in order to clean up some of the wires a little more. The wiring for the turn signal/sidemarker/and windshield washer fluid pump were hanging down in the wheel well a little. This happened because I brought that big loom of wire into the fender well. No problems so far.
I then hooked everything back up, and started testing all the electronics, as well as warming the car up, just to make sure everything was done right. Well, it seems as if I messed up a wire for my driver (left) turn signal since it was blinking fast because it was not working. However, when the headlights were on, the parking lights worked. When the hazards and headlights were on, the turn signal bulb lit up as the parking light, and also flashed with the hazards. But only when the left turn signal was activated, the bulb didn't blink. Ugh.......my first electrical issue.
Hopped in my car, drove over to pepboys to get a new bulb. Thinking that would be the cheapest and easiest fix to the problem, I bought a set of bulbs. Got back in the car to drive home. In order for me to get back to my house, I have to make three left turns (since Pepboys is in town and it is all a bunch of one way streets). While sitting at the second light to turn left, I realized my blinker wasn't out and was working 100% perfect. Go figure. I'll keep an eye on it. Hopefully, this won't be an intermittent problem.
Lastly, I am getting a CEL. It only came on when I drove the car for about 5 minutes. If the car was on, but not moving, no CEL. As soon as I started to drive, it came on, and stayed on until I shut the car off. Plugged the ECU into my laptop and found out I am throwing a code for my Speed sensor. I am thinking it is a simple wiring issue, so it should be fixed tonight.

Chubby Chaser
Joined: Dec 2007
Posts: 4,681
From: whitwell,Tn 37397
hey i had same issue when i did my tuck, the relays and stuff by the front rad support that have bolts holdind them to the frame must be bolted back up its their ground, i put bolts back into them and all my electric issues were fixed, looks great man, i still need to do my driverside, i did the hard side first, ill prob do my driver side tmw,
^^ I didn't touch a relay or any grounds at all. Basically just cut the 13 wires that were in that loom, extended them, snaked them through the fender well, and then re-connected the plastic clips that needed to be plugged in. Regardless, I drove around for about 45 minutes last night and not once did I have a problem with my turn signal.
Additionally, I was able to fix my CEL for the speed sensor wire. I recently did some work to the ecu wiring, and when doing that I noticed that a few of the wires on the conversion harness were cut, and then electrical taped together. So I went ahead and soldered them and heat shrunk the connections. Apparently, the VSS was one of the connections I re-did. Long story short, the pin came loose and fell out. A quick fix and no more CELs.
My son will be getting picked up for the day, so I just might start working on the Aluminum intake box set-up. Otherwise, I might just sit around and relax. Had a disappointing night last night when I was watching the Phillies lose to the Yanks. Ugh.
^^ Yea, I'll snap some next time I have the fender off. I was thinking about taking pictures yesterday when I finished it up for the most part, but didn't have time since I needed to run some errands, and I had my son running around in the yard, so my work speed was already cut in half.
Instead of working on the aluminum intake box thing I devised, I will be meeting up with a friend. Him and I will be taking the cam gear & camshaft out to replace the cam seal. Since I now have the Honda Cam gear key, I should be able to install the adjustable Skunk2 cam gear as well. I may even end up playing around with the timing just for ***** and giggles. Yes, I do know I won't be able to tell if any extra power is being generated from advancing or retarding the timing until I get on a dyno. Anyone have any input as to whether or not I should advance or retard the timing? I do know for turbo's, retarding the timing essentially allows the combustion to occur within the turbo to have the turbo spool faster. But what would you do with a Supercharger? Still retard the timing, or advance it?
I am also hoping to remove my windows today, spray the window tracks down with some type of silicone lube, and re-align the windows in the tracks. I am getting some slow movement from both sides. It always happens when the weather gets colder and I am hoping this helps fix it.
New cam seal is in! Also, the Skunk2 Cam gear is in!

Instead of leaking a big amount of oil (about the diameter of a basketball) on the ground over night after driving, it is now about the diameter of a quarter. Also, there are little dime sized oil dots which looks to be coming from the corners of the oil pan. I will be getting a new oil pan/gasket ASAP.
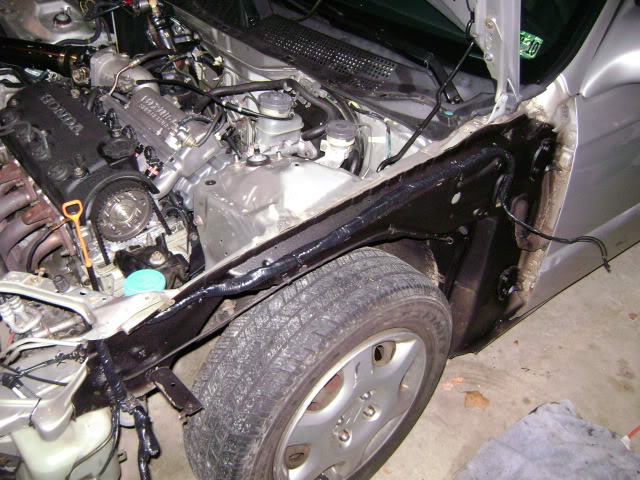
Tonight, the plan is to take off the driver fender, sand down the corners where it meets the door and spray it with a little rustoleum black. When I was doing the wire tuck, the fender fell (somehow) and nicked up the corner. A little brown is starting, so I will stop it before it becomes an issue. 94chb was asking for some shots of how I snake the wire through the fender well, so I'll post some tonight. I am also thinking about buying some of the rubberized spray coating to spray the fender wells with. Trying to simply make it look cleaner and what not.
Also, I plan on cleaning up the garage and my work area up 100%. Doesn't seem like much, but it will actually be a pretty big project. lol!
Edit: Almost forgot, tires rotation tonight, too. The front ones have taken a minor beating within the past 3 weeks or so. Hoping to have these tires last until spring 2010.
Instead of leaking a big amount of oil (about the diameter of a basketball) on the ground over night after driving, it is now about the diameter of a quarter. Also, there are little dime sized oil dots which looks to be coming from the corners of the oil pan. I will be getting a new oil pan/gasket ASAP.
Tonight, the plan is to take off the driver fender, sand down the corners where it meets the door and spray it with a little rustoleum black. When I was doing the wire tuck, the fender fell (somehow) and nicked up the corner. A little brown is starting, so I will stop it before it becomes an issue. 94chb was asking for some shots of how I snake the wire through the fender well, so I'll post some tonight. I am also thinking about buying some of the rubberized spray coating to spray the fender wells with. Trying to simply make it look cleaner and what not.
Also, I plan on cleaning up the garage and my work area up 100%. Doesn't seem like much, but it will actually be a pretty big project. lol!
Edit: Almost forgot, tires rotation tonight, too. The front ones have taken a minor beating within the past 3 weeks or so. Hoping to have these tires last until spring 2010.
Last edited by cvcrcr99; Nov 3, 2009 at 09:57 AM.
^^ Here ya go 94chb...... I also ended up painting the fender wells with rubberized undercoat spray.
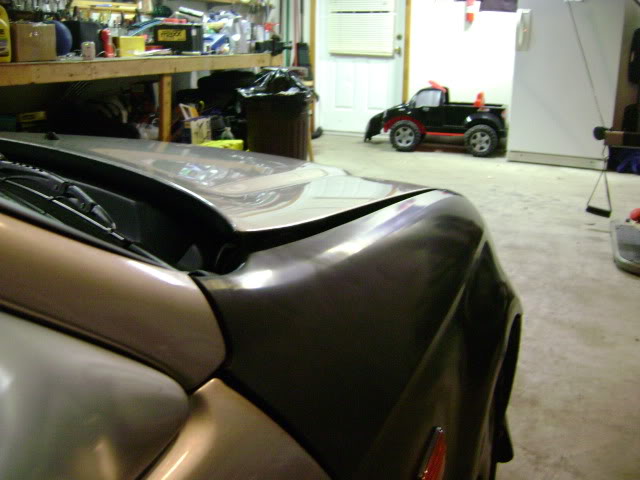
Also, I received my IAT plug. Wired it in and started playing with the laptop to check the temps. During a 2nd & 3rd gear pull, my IATs are around 165-170ish (degrees that is). Wayyyyyy too high! I believe stock Civics usually run around 100 or so degrees. So a buddy and I decided to attempt to lower the intake temps. We did the hood washer trick. Before anyone thinks this is rice or anything, I will say that my IATs dropped to about 140-150ish after this was done, so hate if you want, but it works. Here's a quick pic. I ended up using 6 washers for the rear bolt and four for the front bolt.
It's starting to get a little too cold outside and in my garage, so progress will begin to slow down. Plus, I need to save money and spend it on Christmas gifts and whatnot. The next thing will be some type of intake set-up. I am still trying to figure out exactly how I want it to look, so I am in the middle of tossing a bunch of ideas around.

