
Cvcrcr's project/fix-up thread (version 1.1)


^ i agree the overlay is a bit much...looks a lot cleaner just with the black 
Daym i wish i could have a job installing specialty parts (in ur case mishimoto) haha they make u pay for the parts u install on ur car for them to get instal/testing information from or no? Or at least a discount?
Haha anyway ur project is prety awesome not gonna lie and u put a **** ton of hard work into ur car +1 for CV!
^ i agree the overlay is a bit much...looks a lot cleaner just with the black
Daym i wish i could have a job installing specialty parts (in ur case mishimoto) haha they make u pay for the parts u install on ur car for them to get instal/testing information from or no? Or at least a discount?
Haha anyway ur project is prety awesome not gonna lie and u put a **** ton of hard work into ur car +1 for CV!
The exhaust wrap, thermostat, and radiator were free since I made how to guides with data logs (when applicable) for the company to use. Sooner or later, I will be grabbing some silicone hoses, and an electric fan at a discounted rate. Unless, of course, they want to hand some over to me for an install guide!

**** ton of work wouldn't even begin to explain it...LOL I spent 4 hours taking apart my headunit last night (Ipod cable stopped responding...found a little plug within the HU that came undone some how), re-wiring the sound system stuff (pulling out the entire driver side interior), and looming the amp wiring in the trunk to make it more presentable. Previously, there were just a bunch of wires hanging out, it's much better now.
I have a HUGE to-do list sitting at home of little things that need to get done. Usually, I am happy if I can get one thing done a night.
Update.. getting the parts to fix the head issue today along with a new clutch master cylinder! Let's hope the new clutch master cylinder gets done tonight! Pics of the radiator should be posted tonight as well.


March 2010 ROTM
Joined: Sep 2007
Posts: 1,962
From: Louisville, KY
Its actually pretty hard to photograph CF. My hood always looks much different in pictures than in person since CF changes colors as you move around it. I like the inserts in gauge clusters.
They make stained glass markers that work amazing if you want to do a little more to the cluster. You can change all the white marks by simply coloring them in, but since its for stained glass, it still lets light through as it should.
They make stained glass markers that work amazing if you want to do a little more to the cluster. You can change all the white marks by simply coloring them in, but since its for stained glass, it still lets light through as it should.
Quick pic of the radiator:

Everything fit nicely and it was a quick install!
Tonight, I will either mess with the tail lights (trunk lights not sitting 100% flush), finish the audio wiring 100%, or just clean the interior...it's dirty as f@wk.
Everything fit nicely and it was a quick install!
Tonight, I will either mess with the tail lights (trunk lights not sitting 100% flush), finish the audio wiring 100%, or just clean the interior...it's dirty as f@wk.
Last edited by cvcrcr99; Apr 18, 2010 at 05:38 PM.
Wow that radiator looks nice haha had to get mine swapped out for a new oem one like 2 months ago haha and my interior always gets dirty like as soon as i clean it which pisses me off lmao
^^ Thanks for compliment on the rad. I am starting to hate the drain plug on it though. Gotta see if I can find a different style one at work to grab.
Over-the-weekend update:
Head was pulled off friday night, valve seals were installed (thanks Speed Junkyz!), and the head was re-assembled with the new valve, OEM retainers, etc etc. While checking everything out, I notice the Bisimoto camshaft is starting to get the same nicks and markings as the Crower did. Got to checking the cylinder #3 exhaust lobes (this is where I was having the rocker arm issue(s)), and saw that the Bisimoto cam was basically ripped into pieces. AWESOME! I love spending $375 just to throw it away a month later.
The stock camshaft was put in when the head was re-installed. My buddy and I went out yesterday and picked up a complete z6 head, we ended up swapping out rocker arm assemblies. The rocker arm, where it meets the exhaust lobes, was all f@wked up thus destroying the camshaft. I'll be porting out the head and cleaning it up 100% just for fun. not sure if I will be using it or not later on down the road.
New t-belt tensioner, 60mm TB, and the new donut gasket were installed, too. Sprayed the exhaust wrap on the header with the DEI silicone sealant spray.
Pics later.....still in the middle of tuning with my buddy today. (Haven't made a tune with the 60mm TB, stock cam, and JRSC yet)
Edit: Oh yea... I jumped the gun on Thursday night and bought this:

No more ridiculously high IATs! woot!
Over-the-weekend update:
Head was pulled off friday night, valve seals were installed (thanks Speed Junkyz!), and the head was re-assembled with the new valve, OEM retainers, etc etc. While checking everything out, I notice the Bisimoto camshaft is starting to get the same nicks and markings as the Crower did. Got to checking the cylinder #3 exhaust lobes (this is where I was having the rocker arm issue(s)), and saw that the Bisimoto cam was basically ripped into pieces. AWESOME! I love spending $375 just to throw it away a month later.
The stock camshaft was put in when the head was re-installed. My buddy and I went out yesterday and picked up a complete z6 head, we ended up swapping out rocker arm assemblies. The rocker arm, where it meets the exhaust lobes, was all f@wked up thus destroying the camshaft. I'll be porting out the head and cleaning it up 100% just for fun. not sure if I will be using it or not later on down the road.
New t-belt tensioner, 60mm TB, and the new donut gasket were installed, too. Sprayed the exhaust wrap on the header with the DEI silicone sealant spray.
Pics later.....still in the middle of tuning with my buddy today. (Haven't made a tune with the 60mm TB, stock cam, and JRSC yet
)Edit: Oh yea... I jumped the gun on Thursday night and bought this:
No more ridiculously high IATs! woot!
Last edited by cvcrcr99; Apr 18, 2010 at 07:12 AM.
Pics!
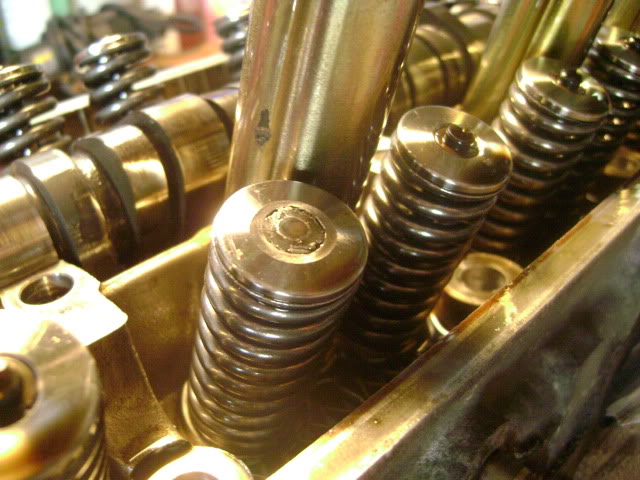
Banged up retainer etc.
Head off....

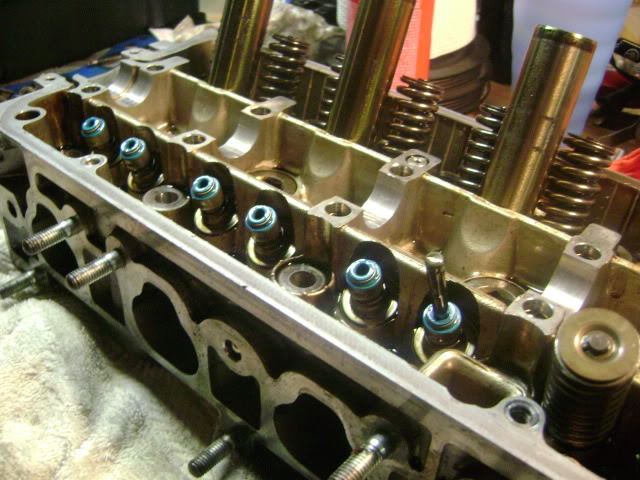
New valves seals!
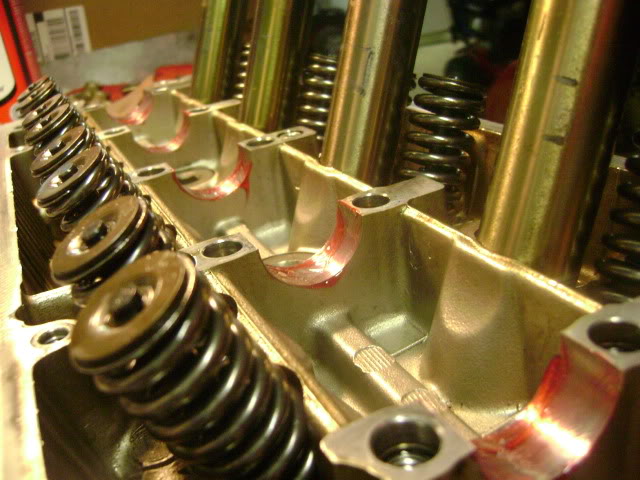
Rebuilding rocker arm...

Assembly lubed up...
Also, I stripped the F-ed up paint on the pass. headlight, sanded, primed, re-painted yadda yadda, and then installed the headlights....

Unfortunately, the paint on the pass. headlight started to darken and look like **** again. The headlights were changed back to stock.. I'll end up taking them apart and painting them a different color... probably a darker bronze, and pray that pass headlight doesn't get f-ed up again.
Banged up retainer etc.
Head off....
New valves seals!
Rebuilding rocker arm...
Assembly lubed up...
Also, I stripped the F-ed up paint on the pass. headlight, sanded, primed, re-painted yadda yadda, and then installed the headlights....
Unfortunately, the paint on the pass. headlight started to darken and look like **** again. The headlights were changed back to stock.. I'll end up taking them apart and painting them a different color... probably a darker bronze, and pray that pass headlight doesn't get f-ed up again.
Meth kit is in, but still needs some tweaking. Its on a non-progressive boost switch that activates the pump at a set PSI (I have it set at like 3-4 psi). It'll be wired into the ECU and added as an AUX port in the s300 to have more control of it. Right now, the car def. pulls a little harder up top, and the IATs are now down an average 30% when at WOT (now around 105* F). I might have to go ahead and experiment with a bigger nozzle to see if more hp gains/lower IATs will happen.
Off to bed for 4 1/2 hours before work tomorrow morning! yay
/sarcasm
Off to bed for 4 1/2 hours before work tomorrow morning! yay
/sarcasm